搜索到
1061
篇与
的结果
-
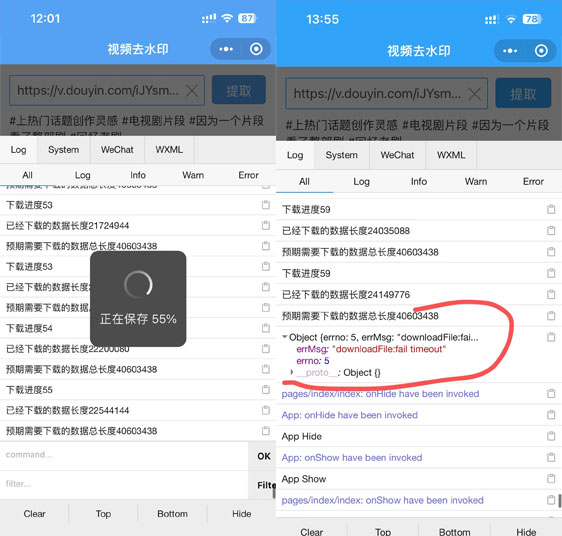
 解决uniapp下载视频,使用uni.downloadFile下载大文件会出现下载到一半就停止问题 uni.uploadFile(OBJECT)将本地资源上传到开发者服务器,客户端发起一个 POST 请求,其中 content-type 为 multipart/form-data。 如页面通过 uni.chooseImage 等接口获取到一个本地资源的临时文件路径后,可通过此接口将本地资源上传到指定服务器。1、问题描述:在使用这个uni-app这个文件下载接口的时候,发现下载到一半就停止下载,经过打印显示下载超时报错为:errMsg: "downloadFile:fail timeout",可以看出示下载超时。后面看了文档有个参数:timeout,改参数不是必须填写的。timeout Number 否 超时时间,单位 ms2、解决方法:我们把超时时间加上timeout: 6000000,并设置高一点即可,默认是60000const downloadTask = uni.downloadFile({ url: DownloadUrl+this.downloadUrl, timeout: 6000000, success: (res) => { if (res.statusCode === 200) { uni.saveVideoToPhotosAlbum({ filePath: res.tempFilePath, success: function() { console.log('success') uni.hideLoading(); uni.showToast({ title: "保存成功", icon: "success" }); }, fail: function(e) { uni.showModal({ content:'检测到您没打开获取信息功能权限,是否去设置打开?', confirmText: "确认", cancelText:'取消', success: (res) => { if(res.confirm){ uni.openSetting({ success: (res) => { console.log(res); uni.showToast({ title: "请重新点击保存到相册~", icon: "none" }); } }) }else{ uni.showToast({ title: "保存失败,请打开权限功能重试", icon: "none" }); } } }) } }); } }, fail: (res) => { console.log(res) } });3、体验地址:
 -
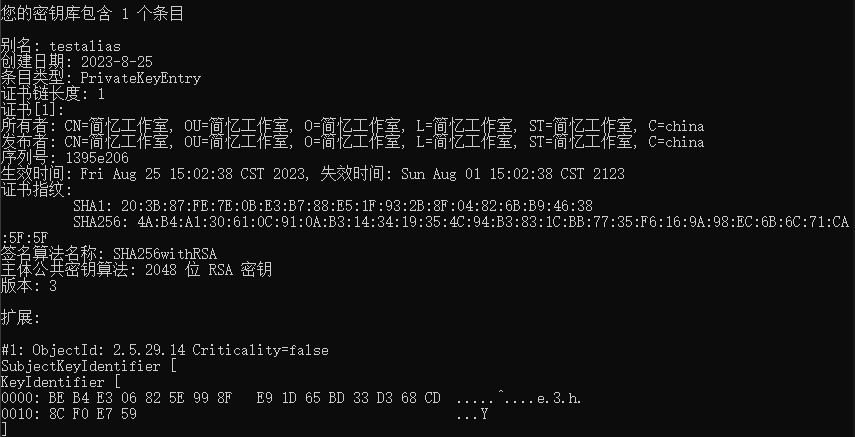
 uni-app如何生成安卓证书,使用jdk生自有证书方法 uni-app生成安卓证书,用于打包安卓APP,以下是生成的方法,供大家参考:1、前提条件,安装jdk1.8:https://xiazai.zol.com.cn/detail/53/529719.shtml2、使用java jdk打包证书,Win+R 进入cmd命令终端cmd C:\Program Files\Java\jdk1.8.0_331\bin3、执行生成安装证书命令keytool -genkey -alias testalias -keyalg RSA -keysize 2048 -validity 36500 -keystore C:\Users/Hm/test.keystore这里的C:\Users/Hm/为本地电脑存放证书路径,可以更改为自己的。4、回车后会提示:Enter keystore password: //输入证书文件密码,输入完成回车 Re-enter new password: //再次输入证书文件密码,输入完成回车 What is your first and last name? [Unknown]: //输入名字和姓氏,输入完成回车 What is the name of your organizational unit? [Unknown]: //输入组织单位名称,输入完成回车 What is the name of your organization? [Unknown]: //输入组织名称,输入完成回车 What is the name of your City or Locality? [Unknown]: //输入城市或区域名称,输入完成回车 What is the name of your State or Province? [Unknown]: //输入省/市/自治区名称,输入完成回车 What is the two-letter country code for this unit? [Unknown]: //输入国家/地区代号(两个字母),中国为CN,输入完成回车 Is CN=XX, OU=XX, O=XX, L=XX, ST=XX, C=XX correct? [no]: //确认上面输入的内容是否正确,输入y,回车 Enter key password for <testalias> (RETURN if same as keystore password): //确认证书密码与证书文件密码一样(HBuilder|HBuilderX要求这两个密码一致),直接回车就可以。以上命令运行完成后就会生成证书,路径为“C:\Users/Hm/test.keystore”。5、查看证书信息keytool -list -v -keystore test.keystoreEnter keystore password: //输入密码,回车
 -

-
 uni-app实现视频组件播放和暂停 前端获取视频id,使用pause(),play()方法控制视频播放和暂停。1、前端代码:<template> <view class="video"> <video id="videoId" :src="https://www.tpxhm.com/fdetail/detail.resDetail.playUrl" autoplay='true' enable-play-gesture='true' controls='true' objectFit="cover" @fullscreenchange='fullscreenchange' play-strategy='2'></video> </view> <view @tap="play" v-if="isPlaying"> <image src="https://www.tpxhm.com/static/pasue.png" mode="widthFix"></image> <text>暂停</text> </view> <view @tap="play" v-if="!isPlaying"> <image src="https://www.tpxhm.com/static/play.png" mode="widthFix"></image> <text>播放</text> </view> </template>2、js代码:<script> export default { // 播放,暂停 play(){ let videoContext = uni.createVideoContext('videoId', this) if (this.isPlaying) { videoContext.pause(); } else { videoContext.play(); } this.isPlaying = !this.isPlaying; }, } </script>
 -
 uniapp微信小程序如何自定义底部tabbar导航 微信小程序默认的tabbar不是很好看,我们可以自自定义底部导航,自定义样式,以下是个uniapp案例demo,供大家参考和使用:一、创建components组件tabbar.vue二、编写底部导航<template> <!-- 底部导航 --> <view class="tabbar" :style="{'padding-bottom': paddingBottomHeight + 'rpx'}"> <view class="tabbar-item" v-for="(item, index) in list" :key="index" @click="tabbarChange(item.path)"> <view class="column-me row-center tabbarActive" v-if="current == item.id"> <view :class="{'cenImgbox' : item.center == 1}"> <image class="item-img" :src="https://www.tpxhm.com/fdetail/item.iconPath" :class="{'cenImg cenImg_h' : item.center == 1}"></image> </view> <view class="text-item-x">{{item.text}}</view> </view> <view class="column-me row-center" v-else> <view :class="{'cenImgbox' : item.center == 1}"> <image class="item-img1" :src="https://www.tpxhm.com/fdetail/item.icon" :class="{'cenImg' : item.center == 1}"></image> </view> <view class="text-item-n">{{item.text}}</view> </view> </view> </view> </template>三、js代码:处理和遍历底部导航<script> export default { props: { current: String }, data() { return { paddingBottomHeight: 0, //苹果X以上手机底部适配高度 list:[], // list: [{ // text: '首页', // icon: '../static/home.png', //未选中图标 // iconPath: '../static/home_h.png', //选中图片 // path: "/pages/index/index", //页面路径 // }, // { // text: '水印', // icon: '../static/water.png', //未选中图标 // iconPath: '../static/water_h.png', //选中图片 // path: "/pages/water/water", //页面路径 // }, // { // text: '头像', // icon: '../static/touxiang.png', //未选中图标 // iconPath: '../static/touxiang_h.png', //选中图片 // path: "/pages/touxiang/touxiang", //页面路径 // }, // { // text: '消息', // icon: '../static/box.png', //未选中图标 // iconPath: '../static/box_h.png', //选中图片 // path: "/pages/box/box", //页面路径 // }, // { // text: '我的', // icon: '../static/user.png', //未选中图标 // iconPath: '../static/user_h.png', //选中图片 // path: "/pages/user/user", //页面路径 // } // ] }; }, async created() { let that = this; uni.getSystemInfo({ success: function(res) { let model = ['X', 'XR', 'XS', '11', '12', '13', '14', '15']; model.forEach(item => { //适配iphoneX以上的底部,给tabbar一定高度的padding-bottom if (res.model.indexOf(item) != -1 && res.model.indexOf('iPhone') != -1) { that.paddingBottomHeight = 40; } }) } }); uni.showLoading({ title: '加载中' }); const result = await this.$myRequest({ url: '/Blog/getTabbar', }) if(result.data.code==200){ this.list = result.data.data uni.hideLoading() // console.log(result.data.data); } }, watch: { }, methods: { tabbarChange(path) { uni.switchTab({ url: path }) // console.log(path, 'pathpath') // this.$.open_tab(path) } } }; </script>四、样式代码:<style scoped> .tabbarActive { color: #31a3fb !important; transform: scale(1.1); } .tabbar { position: fixed; bottom: 0rpx; left: 0rpx; right: 0rpx; display: flex; justify-content: space-around; align-items: center; width: 100%; height: 100rpx; background: rgba(255,255,255,.9) ; z-index: 999; box-shadow: 15rpx 5rpx 5rpx 1rpx rgba(0, 0, 0, 0.5); } .tabbar-item { display: flex; flex-direction: column; align-items: center; justify-content: center; height: 100rpx; width: 100%; font-size: 20rpx; transition: transform 0.3s; } .column-me { display: flex; flex-direction: column; } .row-center { align-items: center; } .text-item-x { color: #215AA0; } .text-item-n { color: #6D7984; } /* 选中后 */ .item-img { width: 50rpx; height: 50rpx; } /* 选中前 */ .item-img1 { width: 50rpx; height: 50rpx; } /* 中间图片高度 */ .cenImgbox { width: 98rpx !important; height: 98rpx !important; margin-top: -34rpx; border-radius: 50%; /* background: #000; */ background: rgba(255,255,255,.9) ; } /* 中间图片高度 */ .cenImg { width: 68rpx !important; height: 68rpx !important; display: block; margin: 15rpx auto; border-radius: 50%; background-color: #aaaaaa; } .cenImg_h{ background-color: #31a3fb; } </style>五、使用方法:在每个页面引入如下导航代码<template> <!--index.wxml--> <view class="container"> <!-- :current="'0'" 第一个选中 --> <Tabbar :current="'1'"></Tabbar> </view> </template>5.1、在onShow方法里面加入隐藏默认导航onShow(){ uni.hideTabBar({ animation:false }) }5.2、在pages.json文件里面开启自定义导航设置 "tabBar": { "custom": true, }6、案例效果:以上就是自定义tabbar导航案例,效果展示可以预览官方小程序


