搜索到
1061
篇与
的结果
-
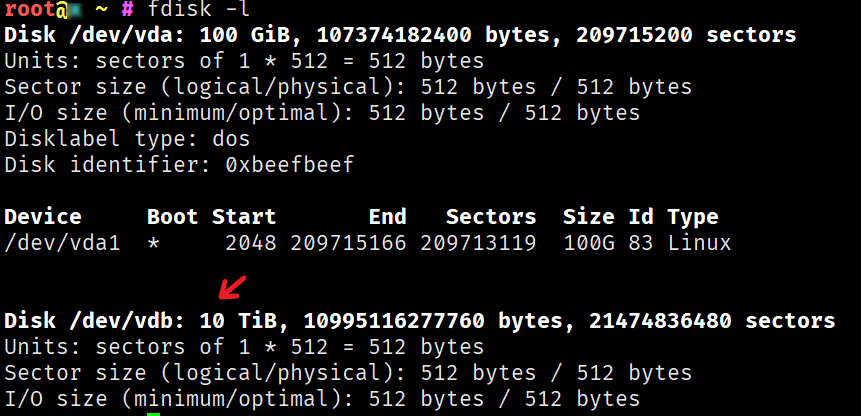
 Debian / Ubuntu 使用 parted 转换硬盘为 GPT 并挂载分区教程 本文将指导如何在 Debian 和 Ubuntu 下使用 parted 转换硬盘为 GPT 并分区挂载。为什么使用 GPT 格式?有时候我们会在 VPS 或服务器上挂载一块大于 2 TiB 的硬盘,默认的 MBR 格式是无法使用超过 2 TiB 的硬盘的,所以我们需要转换为 GPT 格式。使用 fdisk -l 命令可以看到这个硬盘已经安装,但是没有任何分区:对应的硬盘符是 /dev/vdb,有些机器可能是 /dev/sdb,请注意自行更换盘符。使用 parted 转换硬盘为 GPT 格式然后我们安装 parted:apt install parted -y 接着我们转换 /dev/vdb 为 GPT 格式,首先使用 parted /dev/vdb 命令选择硬盘,然后输入 mklabel gpt,回车确认后就转换完成了,此时可以用 print 命令查看这个硬盘是否已经是 GPT 格式:按下 ctrl + c 退出后也可以使用 fdisk -l 命令查看硬盘已经是 GPT 格式:使用 fdisk 进行分区挂载然后我们就可以使用 fdisk 命令来挂载硬盘,首先进入硬盘:fdisk /dev/vdb 输入 n 新建分区,没有特殊需求就都回车选默认,然后再输入 w 保存并退出:此时我们通过 fdisk -l 命令即可看到已经多出一个 /dev/vdb1 的硬盘设备:然后我们分区成 ext4 格式:mkfs -t ext4 /dev/vdb1 接着把他挂载到 /mnt 目录:mount /dev/vdb1 /mnt 设置开机自启:echo "/dev/vdb1 /mnt ext4 defaults 1 2" >> /etc/fstab 大功告成,使用 df -hT 命令查看挂载和格式是否正确:记得检查下重启后是否生效哦
 -
 Linux 下 Bash 脚本 bad interpreter 报错的解决方法 本文理论上适合所有 Linux 操作系统。问题复现有时候为了图方便,我们会直接在本机 git clone 一个 Github 的私有仓库,然后再使用 lrzsz 或 sftp 上传到服务器上,此时如果你本机是 Windows 系统,服务器是 Linux 系统,那么 git clone 下来的脚本文件编码就自动给你换成 Windows 的 CRLF,然后在 Linux 服务器上执行脚本时,会报错/bin/bash^M: bad interpreter: No such file or directory 解决方法一使用 VS Code 或者其他类似的软件,打开脚本手工转换编码为 UNIX (LF),一般情况下你可以在编辑器的右下角找到:然后换成 LF 并保存:再重新上传即可。解决方法二直接在 Linux 终端下运行:sed -i -e 's/\r$//' 脚本文件名 好了,就完事了 = =
 -
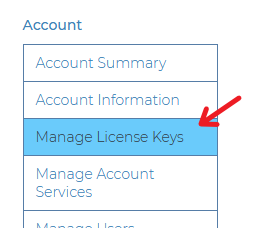
 Docker 安装 Plausible Analytics 自建网站统计 本文将指导使用 Docker 安装 Plausible Analytics 自建网站统计。PS:本文同时适用于任何可安装 Docker 的 Linux 发行版。为什么要自建网站统计?原因很简单,自己网站的数据当然要自己保管,你希望你网站的数据都被第三方卖给 “所谓的” 大数据分析公司吗?Plausible Analytics 是一款以隐私保护著称的网站统计软件,经过几个月的试用,基本可以满足所有的需求,可以取代商业化的 Google Analytics 等产品。安装 Docker 和 Docker ComposeDebian 和 Ubuntu 系统请参考本站教程。其他 Linux 系统可以使用 Docker 官方的脚本安装 Docker 和 Docker Compose:curl -fsSL https://get.docker.com -o get-docker.sh sh get-docker.sh 安装 Plausible Analytics建议安装在 /opt/plausible 目录:mkdir -p /opt/plausible cd /opt/plausible 首先,我们需要建立一个 docker-compose.yaml 文件,请按照实际需求修改参数:services: mail: image: bytemark/smtp restart: always plausible_db: image: postgres:16-alpine volumes: - db-data:/var/lib/postgresql/data environment: - POSTGRES_PASSWORD=postgres restart: always plausible_events_db: image: clickhouse/clickhouse-server:24.3.3.102-alpine volumes: - event-data:/var/lib/clickhouse - event-logs:/var/log/clickhouse-server - ./clickhouse/clickhouse-config.xml:/etc/clickhouse-server/config.d/logging.xml:ro - ./clickhouse/clickhouse-user-config.xml:/etc/clickhouse-server/users.d/logging.xml:ro ulimits: nofile: soft: 262144 hard: 262144 restart: always plausible: image: ghcr.io/plausible/community-edition command: sh -c "sleep 10 && /entrypoint.sh db createdb && /entrypoint.sh db migrate && /entrypoint.sh run" depends_on: - plausible_db - plausible_events_db - mail - geoip volumes: - ./geoip:/geoip:ro ports: - 127.0.0.1:8000:8000 env_file: - plausible-conf.env restart: always geoip: image: maxmindinc/geoipupdate env_file: - geoip.env volumes: - ./geoip:/usr/share/GeoIP volumes: db-data: driver: local event-data: driver: local geoip: driver: local 然后我们在相同目录建立一个 geoip 的文件夹和 plausible-conf.env 的文件:mkdir -p geoip touch plausible-conf.env touch geoip.env 修改 plausible-conf.env,按照官网的教程进行配置,假设你的网址是 https://stat.example.com/,举例如下:ADMIN_USER_EMAIL=管理员邮箱 ADMIN_USER_NAME=管理员用户名 ADMIN_USER_PWD=管理员密码 BASE_URL=https://stat.example.com/ SECRET_KEY_BASE=随机 64 个字符 TOTP_VAULT_KEY=随机 32 个字符 MAILER_EMAIL=网站通知邮箱 SMTP_HOST_ADDR=SMTP 主机名 SMTP_HOST_PORT=SMTP 端口 SMTP_USER_NAME=SMTP 用户名 SMTP_USER_PWD=SMTP 密码 DISABLE_REGISTRATION=true GEOLITE2_COUNTRY_DB=/geoip/GeoLite2-Country.mmdb SECRET_KEY_BASE 需要一串 64 位的随机字符,可以使用 openssl rand -base64 64 生成。TOTP_VAULT_KEY 需要一串 32 位的随机字符,可以使用 openssl rand -base64 32 生成。DISABLE_REGISTRATION 设置 true 即关闭用户注册。SMTP 可以使用市面上所有的邮件发送产品,或者懒人也可以直接用 Gmail 之类的免费服务,也可以自己搭建 Mailcow 自己用,教程在这儿。然后我们注册个 Maxmind 帐号,注册成功后在左侧菜单 Account > Manage License Keys 里点击 Generate new license key 获取一个 License key 并记录 Account ID 和这个 License key:然后修改 geoip.env,并填入如下信息:GEOIPUPDATE_EDITION_IDS=GeoLite2-Country GEOIPUPDATE_FREQUENCY=168 # update every 7 days 设置 7 天更新一次 GeoIP 数据库 GEOIPUPDATE_ACCOUNT_ID=你的 Account ID GEOIPUPDATE_LICENSE_KEY=你的 License Key 然后抓取镜像并启动:docker compose pull docker compose up -d 启动完成后即可试用 http://127.0.0.1:8000/ 访问 Plausible,如果需要对外进行服务,我们还需要配置 Nginx 反向代理。设置 Nginx 反代从 docker-compose.yaml 配置里可以看出,我们监听在本地 8080 端口,此时我们可以用 Nginx 反代并开启 HTTPS,您可以参考本站教程:安装 NginxNginx 配置 SSL 证书使用 acme.sh 配置自动续签 SSL 证书然后直接反代本地 8080 端口,参考配置如下:location / { proxy_set_header X-Real-IP $remote_addr; proxy_set_header X-Forwarded-For $proxy_add_x_forwarded_for; proxy_set_header Host $http_host; proxy_set_header X-NginX-Proxy true; proxy_http_version 1.1; proxy_set_header Upgrade $http_upgrade; proxy_redirect off; proxy_set_header X-Forwarded-Proto $scheme; proxy_connect_timeout 300; proxy_send_timeout 300; proxy_read_timeout 300; send_timeout 300; proxy_pass http://127.0.0.1:8000; location = /live/websocket { proxy_pass http://127.0.0.1:8000; proxy_http_version 1.1; proxy_set_header Upgrade $http_upgrade; proxy_set_header Connection "Upgrade"; } } 重启 Nginx 后生效我们即可访问 https://stat.example.com/配置 Plausible Analytics访问刚搭建好的 Plausible 并使用配置文件里的管理员邮箱和密码登录 (要使用邮箱登录哦,不是用户名):登录后新建第一个要统计的网站域名,点击 +Add a website:输入要统计的网站域名,选择发送报告的时区,然后点击 Add snippet → 按钮:然后把统计代码插入你的网页即可进行统计:更新 Plausible Analytics万能的 Docker 更新大法:# 抓取最新的 Docker 镜像 docker compose pull # 重启所有 Docker 镜像 docker compose up -d # 清理 Docker 旧容器和残留镜像 docker system prune 备份 Plausible Analytics其实主要是备份数据库,相关命令如下:docker exec -t plausible_plausible_db_1 pg_dumpall -c -U postgres | gzip > dump_$(date +"%Y-%m-%d_%H_%M_%S").gz 即可按照当前时间 dump 出 PostgreSQL 数据库并使用 gzip 压缩打包。迁移 Plausible Analytics可以参考 Mailcow 的迁移方法。卸载 Plausible Analyticsdocker compose down rm -rf /opt/plausible docker image rm postgres:12 docker image rm maxmindinc/geoipupdate:latest docker image rm plausible/analytics:latest docker image rm yandex/clickhouse-server:21.3.2.5 docker image rm bytemark/smtp:latest docker volume rm plausible_db-data docker volume rm plausible_event-data WordPress 添加方法直接修改你使用的主题的 header.php 文件,在 <?php wp_head(); ?> 后面添加统计代码即可。不想修改主题的也可以直接装官方的插件。VuePress 添加方法如果你使用 VuePress v1.x,那么修改 .vuepress/config.js 文件,在 module.exports 加入:['script', {}, ` const script = document.createElement('script'); script.async = true; script.defer = true; script['data-domain'] = '统计域名'; script.src = 'https://stat.example.com/js/plausible.js'; document.head.appendChild(script);` ], 如果你试用 VuePress v2.x,那么修改 .vuepress/config.ts 文件,在 export default 加入:['script', {}, ` const script = document.createElement('script'); script.async = true; script.defer = true; script['data-domain'] = '统计域名'; script.src = 'https://stat.example.com/js/plausible.js'; document.head.appendChild(script);` ], Next.js 添加方法安装 next-plausible 这个包,然后使用类似如下的代码:import PlausibleProvider from 'next-plausible' export default function MyApp({ Component, pageProps }) { return ( <PlausibleProvider domain="统计域名" customDomain="https://stat.example.com" selfHosted> <Component {...pageProps} /> </PlausibleProvider> ) } 更多的添加方法请查看官网的文档。很多广告屏蔽插件会屏蔽 plausible.js,此时可以把 plausible.js 替换成 script.js 防止被屏蔽。
 -
 Ubuntu 20.04 Focal 升级 Ubuntu 22.04 Jammy 本文将指导如何升级 Ubuntu 20.04 Focal 到 Ubuntu 22.04 Jammy。前言Ubuntu 22.04 Jammy Jellyfish 已正式发布,如果您使用 Ubuntu 20.04,那么可以参考本站教程升级。准备工作除非你是物理服务器,以及没有用过奇奇怪怪定制或修改的内核的 KVM 构架的 VPS 和云主机,否则升级大版本更新内核是有一定机率导致 Grub 加载失败的,切记备份重要数据!OpenVZ 6 和 LXC 构架的 VPS 是无法升级的,因为他们没有自己独立的内核再强调一遍,一定要备份重要数据!以下操作需要在 root 用户下完成,请使用 sudo -i 或 su root 切换到 root 用户进行操作更新系统首先需要更新你当前的系统apt update apt upgrade -y apt dist-upgrade -y apt autoclean apt autoremove -y 如果内核更新了,建议重启让最新的内核生效。升级系统我们有两种方法升级到最新的系统,第一种是和 Debian 类似,手工修改 apt 源文件:首先更新 apt 源,替换 focal 为 jammy:sed -i 's/focal/jammy/g' /etc/apt/sources.list sed -i 's/focal/jammy/g' /etc/apt/sources.list.d/*.list 默认的系统 apt 源文件 /etc/apt/sources.list 应该是类似这样的:# See http://help.ubuntu.com/community/UpgradeNotes for how to upgrade to # newer versions of the distribution. deb http://archive.ubuntu.com/ubuntu/ jammy main restricted # deb-src http://archive.ubuntu.com/ubuntu/ jammy main restricted ## Major bug fix updates produced after the final release of the ## distribution. deb http://archive.ubuntu.com/ubuntu/ jammy-updates main restricted # deb-src http://archive.ubuntu.com/ubuntu/ jammy-updates main restricted ## N.B. software from this repository is ENTIRELY UNSUPPORTED by the Ubuntu ## team. Also, please note that software in universe WILL NOT receive any ## review or updates from the Ubuntu security team. deb http://archive.ubuntu.com/ubuntu/ jammy universe # deb-src http://archive.ubuntu.com/ubuntu/ jammy universe deb http://archive.ubuntu.com/ubuntu/ jammy-updates universe # deb-src http://archive.ubuntu.com/ubuntu/ jammy-updates universe ## N.B. software from this repository is ENTIRELY UNSUPPORTED by the Ubuntu ## team, and may not be under a free licence. Please satisfy yourself as to ## your rights to use the software. Also, please note that software in ## multiverse WILL NOT receive any review or updates from the Ubuntu ## security team. deb http://archive.ubuntu.com/ubuntu/ jammy multiverse # deb-src http://archive.ubuntu.com/ubuntu/ jammy multiverse deb http://archive.ubuntu.com/ubuntu/ jammy-updates multiverse # deb-src http://archive.ubuntu.com/ubuntu/ jammy-updates multiverse ## N.B. software from this repository may not have been tested as ## extensively as that contained in the main release, although it includes ## newer versions of some applications which may provide useful features. ## Also, please note that software in backports WILL NOT receive any review ## or updates from the Ubuntu security team. deb http://archive.ubuntu.com/ubuntu/ jammy-backports main restricted universe multiverse # deb-src http://archive.ubuntu.com/ubuntu/ jammy-backports main restricted universe multiverse ## Uncomment the following two lines to add software from Canonical's ## 'partner' repository. ## This software is not part of Ubuntu, but is offered by Canonical and the ## respective vendors as a service to Ubuntu users. # deb http://archive.canonical.com/ubuntu jammy partner # deb-src http://archive.canonical.com/ubuntu jammy partner deb http://archive.ubuntu.com/ubuntu jammy-security main restricted # deb-src http://archive.ubuntu.com/ubuntu jammy-security main restricted deb http://archive.ubuntu.com/ubuntu jammy-security universe # deb-src http://archive.ubuntu.com/ubuntu jammy-security universe deb http://archive.ubuntu.com/ubuntu jammy-security multiverse # deb-src http://archive.ubuntu.com/ubuntu jammy-security multiverse 国内服务器可以替换 archive.ubuntu.com 为 mirrors.tuna.tsinghua.edu.cn然后我们再次执行更新系统:apt update apt upgrade -y apt dist-upgrade -y 更新过程种会提示一些软件是否需要自动重启,选 Yes 即可,以及一些软件的配置文件是否需要更新,按照自己的情况选择即可,默认回车即视为使用旧的配置文件,一般会出现在 OpenSSH 等软件的更新上。更新后删除不必要的软件和依赖:apt autoclean apt autoremove -y 然后我们使用 reboot 命令重启系统,耐心等待后,查看最新的系统版本:root@ubuntu ~ # lsb_release -a No LSB modules are available. Distributor ID: Ubuntu Description: Ubuntu 22.04 LTS Release: 22.04 Codename: jammy root@ubuntu ~ # uname -a Linux ubuntu 5.15.0-25 #4-Ubuntu SMP Fri Apr 1 07:36:38 UTC 2022 x86_64 x86_64 x86_64 GNU/Linux 这时我们就已经更新到了最新的 Ubuntu 22.04 Jammy 和内核了。第二种方法是使用 do-release-upgrade 命令首先安装 update-manager-core 软件包:apt install update-manager-core 然后运行 do-release-upgrade -d 即可更新,其他方法和上面一样,不再详细解释。如果添加过一些 PPA 源,如果他们还未发布最新版本的软件,可以临时先取消,比如add-apt-repository --remove ppa:ondrej/php
 -
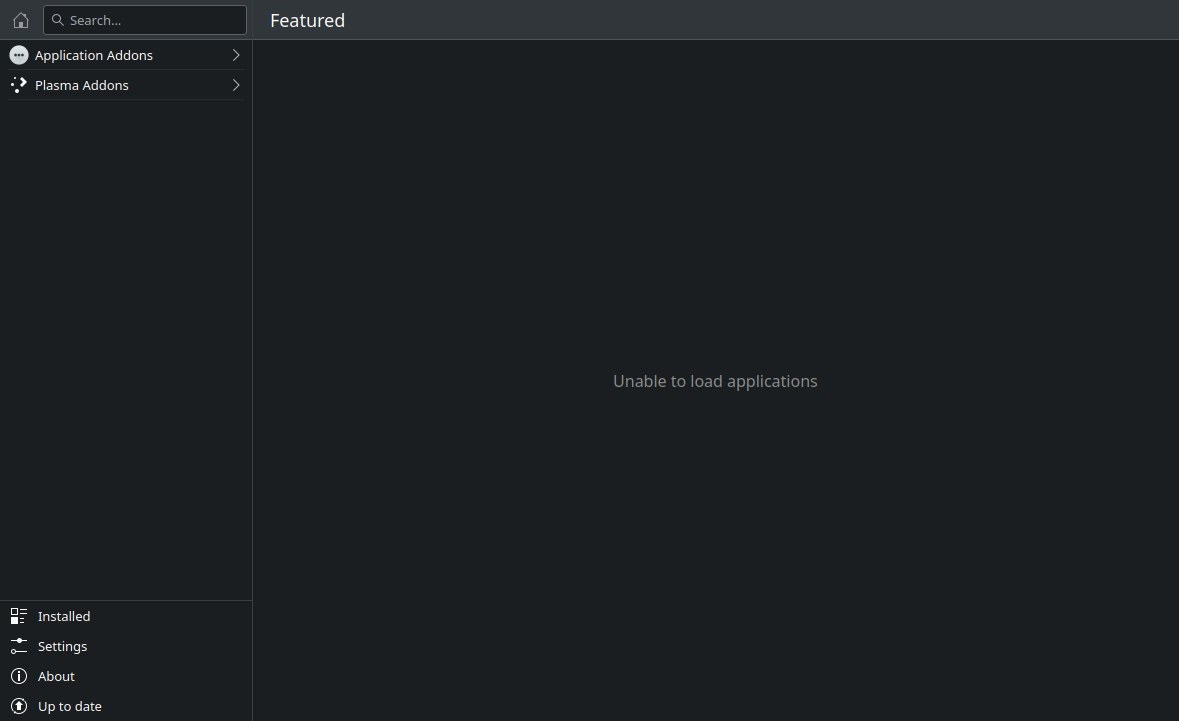
 Arch Linux 下解决 KDE Plasma Discover 的 Unable to load applications 错误 本文将指导在 Arch Linux 下解决 KDE Plasma Discover 的 unable to load applications 错误。前言使用 Arch Linux 安装 KDE Plasma 桌面以后,KDE 的软件管理器 Discover 一打开就提示 Unable to load applications 错误:其他所有设置也无法使用:解决方法参考这个帖子,直接安装 packagekit-qt5 包即可解决:sudo pacman -S packagekit-qt5 重新打开 Discover,一切问题解决:


