搜索到
1613
篇与
的结果
-
 Debian 12 安装 Nextcloud 服务端 本文将指导如何在 Debian 12 下安装并配置 Nextcloud 服务端。PS:本文同时适用于 Debian 10 Buster 以及 Ubuntu 20.04 Focal什么是 Nextcloud?Nextcloud 是一套用于建立网络硬盘的客户端和服务器软件。其功能和 Dropbox 相近,但 Nextcloud 是开源的,任何人都可以在自己的服务器上安装并运行它。虽然 Nextcloud 性能比较弱,但是实际测试下来几个人的小团队用用也足够了。准备环境由于 Nextcloud 消耗资源比较大,一般我们不建议在 4GB 内存以下的 VPS 安装,官方推荐配置为 512MB 内存,实际体验下来安装在 8GB 内存上跑 Nextcloud 会比较流畅。配置 LEMP 环境首先,可以参考本站教程配置好 LEMP 环境,在安装 PHP 的时候,请选择 PHP 8.3 以及以下模块:apt install php8.3-common php8.3-fpm php8.3-mysql php8.3-curl php8.3-gd php8.3-mbstring php8.3-xml php8.3-xmlrpc php8.3-zip php8.3-bz2 php8.3-intl php8.3-ldap php8.3-smbclient php8.3-bcmath php8.3-gmp php8.3-imap php8.3-opcache php8.3-imagick redis-server php8.3-redis -y 这里我们使用了 Redis 作为缓存,所以需要安装 redis-server 和 php8.3-redis,请不要直接安装 php-redis,否则系统会默认把所有的 PHP 版本都给你安装一遍哦。优化 PHP-FPM 设置由于默认的 PHP-FPM 设置只适合小型应用,不适合 Nextcloud 这种消耗资源比较大的程序,所以我们可以修改如下参数,这里的例子是你想设置最大上传的文件为 10GB:sed -i 's/;cgi.fix_pathinfo=1/cgi.fix_pathinfo=0/' /etc/php/8.3/fpm/php.ini sed -i 's/upload_max_filesize = 2M/upload_max_filesize = 10240M/' /etc/php/8.3/fpm/php.ini sed -i 's/post_max_size = 8M/post_max_size = 10240M/' /etc/php/8.3/fpm/php.ini sed -i 's/memory_limit = 128M/memory_limit = 512M/' /etc/php/8.3/fpm/php.ini sed -i 's/#opcache.interned_strings_buffer=8/opcache.interned_strings_buffer=16/' /etc/php/8.3/fpm/php.ini sed -i 's/;listen.mode = 0660/listen.mode = 0660/' /etc/php/8.3/fpm/pool.d/www.conf sed -i 's/pm.max_children = 5/pm.max_children = 20/' /etc/php/8.3/fpm/pool.d/www.conf sed -i 's/pm.start_servers = 2/pm.start_servers = 4/' /etc/php/8.3/fpm/pool.d/www.conf sed -i 's/pm.min_spare_servers = 1/pm.min_spare_servers = 2/' /etc/php/8.3/fpm/pool.d/www.conf sed -i 's/pm.max_spare_servers = 3/pm.max_spare_servers = 8/' /etc/php/8.3/fpm/pool.d/www.conf sed -i 's/;clear_env = no/clear_env = no/' /etc/php/8.3/fpm/pool.d/www.conf 具体配置可以参考官网教程。然后我们重启 PHP-FPM 生效:systemctl restart php8.3-fpm.service 配置 Nginx我们假设你的 Nextcloud 需要安装在 /var/www/nextcloud 目录,配置的域名是 cloud.example.com,证书文件位于 /etc/nginx/ssl/cloud.example.com.crt,证书私钥位于 /etc/nginx/ssl/cloud.example.com.key,那么我们直接参考官网上的第三方教程配置 Nginx:upstream php-handler { #server 127.0.0.1:9000; server unix:/var/run/php/php8.3-fpm.sock; } # Set the `immutable` cache control options only for assets with a cache busting `v` argument map $arg_v $asset_immutable { "" ""; default "immutable"; } server { listen 443 ssl; listen [::]:443 ssl; listen 443 quic; listen [::]:443 quic; http2 on; server_name cloud.example.com; # Path to the root of your installation root /var/www/nextcloud; ssl_session_timeout 1d; ssl_session_cache shared:MozSSL:10m; # about 40000 sessions ssl_session_tickets off; # curl https://ssl-config.mozilla.org/ffdhe2048.txt > /etc/nginx/ssl/dhparam ssl_dhparam /etc/nginx/ssl/dhparam; ssl_protocols TLSv1.2 TLSv1.3; ssl_ciphers ECDHE-ECDSA-AES128-GCM-SHA256:ECDHE-RSA-AES128-GCM-SHA256:ECDHE-ECDSA-AES256-GCM-SHA384:ECDHE-RSA-AES256-GCM-SHA384:ECDHE-ECDSA-CHACHA20-POLY1305:ECDHE-RSA-CHACHA20-POLY1305:DHE-RSA-AES128-GCM-SHA256:DHE-RSA-AES256-GCM-SHA384; ssl_prefer_server_ciphers off; # OCSP stapling ssl_stapling on; ssl_stapling_verify on; resolver 1.1.1.1 8.8.8.8 valid=300s; resolver_timeout 10s; ssl_certificate /etc/nginx/ssl/cloud.example.com.crt; ssl_certificate_key /etc/nginx/ssl/cloud.example.com.key; ssl_trusted_certificate /etc/nginx/ssl/cloud.example.com.crt; # HSTS settings # WARNING: Only add the preload option once you read about # the consequences in https://hstspreload.org/. This option # will add the domain to a hardcoded list that is shipped # in all major browsers and getting removed from this list # could take several months. add_header Strict-Transport-Security "max-age=63072000; includeSubDomains; preload"; # set max upload size and increase upload timeout: client_max_body_size 10240M; client_body_timeout 300s; fastcgi_buffers 64 4K; # Enable gzip but do not remove ETag headers gzip on; gzip_vary on; gzip_comp_level 4; gzip_min_length 256; gzip_proxied expired no-cache no-store private no_last_modified no_etag auth; gzip_types application/atom+xml application/javascript application/json application/ld+json application/manifest+json application/rss+xml application/vnd.geo+json application/vnd.ms-fontobject application/wasm application/x-font-ttf application/x-web-app-manifest+json application/xhtml+xml application/xml font/opentype image/bmp image/svg+xml image/x-icon text/cache-manifest text/css text/plain text/vcard text/vnd.rim.location.xloc text/vtt text/x-component text/x-cross-domain-policy; # Pagespeed is not supported by Nextcloud, so if your server is built # with the `ngx_pagespeed` module, uncomment this line to disable it. #pagespeed off; # HTTP response headers borrowed from Nextcloud `.htaccess` add_header Referrer-Policy "no-referrer" always; add_header X-Content-Type-Options "nosniff" always; add_header X-Download-Options "noopen" always; add_header X-Frame-Options "SAMEORIGIN" always; add_header X-Permitted-Cross-Domain-Policies "none" always; add_header X-Robots-Tag "none" always; add_header X-XSS-Protection "1; mode=block" always; # Remove X-Powered-By, which is an information leak fastcgi_hide_header X-Powered-By; # Specify how to handle directories -- specifying `/index.php$request_uri` # here as the fallback means that Nginx always exhibits the desired behaviour # when a client requests a path that corresponds to a directory that exists # on the server. In particular, if that directory contains an index.php file, # that file is correctly served; if it doesn't, then the request is passed to # the front-end controller. This consistent behaviour means that we don't need # to specify custom rules for certain paths (e.g. images and other assets, # `/updater`, `/ocm-provider`, `/ocs-provider`), and thus # `try_files $uri $uri/ /index.php$request_uri` # always provides the desired behaviour. index index.php index.html /index.php$request_uri; # Rule borrowed from `.htaccess` to handle Microsoft DAV clients location = / { if ( $http_user_agent ~ ^DavClnt ) { return 302 /remote.php/webdav/$is_args$args; } } location = /robots.txt { allow all; log_not_found off; access_log off; } # Make a regex exception for `/.well-known` so that clients can still # access it despite the existence of the regex rule # `location ~ /(\.|autotest|...)` which would otherwise handle requests # for `/.well-known`. location^~ /.well-known { # The rules in this block are an adaptation of the rules # in `.htaccess` that concern `/.well-known`. location = /.well-known/carddav { return 301 /remote.php/dav/; } location = /.well-known/caldav { return 301 /remote.php/dav/; } location /.well-known/acme-challenge { try_files $uri $uri/ =404; } location /.well-known/pki-validation { try_files $uri $uri/ =404; } # Let Nextcloud's API for `/.well-known` URIs handle all other # requests by passing them to the front-end controller. return 301 /index.php$request_uri; } # Rules borrowed from `.htaccess` to hide certain paths from clients location ~ ^/(?:build|tests|config|lib|3rdparty|templates|data)(?:$|/) { return 404; } location ~ ^/(?:\.|autotest|occ|issue|indie|db_|console) { return 404; } # Ensure this block, which passes PHP files to the PHP process, is above the blocks # which handle static assets (as seen below). If this block is not declared first, # then Nginx will encounter an infinite rewriting loop when it prepends `/index.php` # to the URI, resulting in a HTTP 500 error response. location ~ \.php(?:$|/) { # Required for legacy support rewrite^/(?!index|remote|public|cron|core\/ajax\/update|status|ocs\/v[12]|updater\/.+|oc[ms]-provider\/.+|.+\/richdocumentscode\/proxy) /index.php$request_uri; fastcgi_split_path_info^(.+?\.php)(/.*)$; set $path_info $fastcgi_path_info; try_files $fastcgi_script_name =404; include fastcgi_params; fastcgi_param SCRIPT_FILENAME $document_root$fastcgi_script_name; fastcgi_param PATH_INFO $path_info; fastcgi_param HTTPS on; fastcgi_param modHeadersAvailable true; # Avoid sending the security headers twice fastcgi_param front_controller_active true; # Enable pretty urls fastcgi_pass php-handler; fastcgi_intercept_errors on; fastcgi_request_buffering off; fastcgi_max_temp_file_size 0; } location ~ \.(?:css|js|svg|gif|png|jpg|ico|wasm|tflite|map)$ { try_files $uri /index.php$request_uri; add_header Cache-Control "public, max-age=15778463, $asset_immutable"; access_log off; # Optional: Don't log access to assets location ~ \.wasm$ { default_type application/wasm; } } location ~ \.woff2?$ { try_files $uri /index.php$request_uri; expires 7d; # Cache-Control policy borrowed from `.htaccess` access_log off; # Optional: Don't log access to assets } # Rule borrowed from `.htaccess` location /remote { return 301 /remote.php$request_uri; } location / { try_files $uri $uri/ /index.php$request_uri; } } 关于 SSL 配置可以参考本站教程《Nginx 配置 SSL 证书》和《使用 acme.sh 配置自动续签 SSL 证书》。如果要修改上传文件大小限制,请求改 Nginx 配置里的 client_max_body_size 10240M; 和 PHP 配置里的 upload_max_filesize 和 post_max_size 参数,本教程举例是上传文件最大限制 10GB。检查无误后重启 Nginx 生效nginx -t nginx -s reload 安装 Nextcloud首先进入 /var/www 目录,下载并解压 Nextcloud,截止本文发布,目前的最新稳定是 29.0.x:cd /var/www wget -O nextcloud.zip https://download.nextcloud.com/server/releases/latest-29.zip unzip nextcloud.zip 然后我们设置解压出来的 nextcloud 文件夹权限和 PHP 以及 Nginx 对应,设置为 www-data 用户,因为 Debian 下默认 www-data 用户/用户组的 uid 和 gid 是 33,所以直接使用 chown 33:33 即可:chown 33:33 nextcloud -R find nextcloud/ -type d -exec chmod 750 {} \; find nextcloud/ -type f -exec chmod 640 {} \; 安装完成后,直接访问 https://cloud.example.com 填入你配置好的数据库信息以及管理员帐号密码即可登录你的 Nextcloud。配置 Redis 缓存Debian 默认安装的 redis-server 已经给你基本配置好了,只监听在本地 127.0.0.1 的 6379 端口,如果没有特殊需求不需要修改。首先,我们把 redis 用户加入 www-data 用户组:usermod -a -G redis www-data 然后修改 /var/www/nextcloud/config/config.php 文件,在最后一行 ); 字符前加入: 'memcache.locking' => '\\OC\\Memcache\\Redis', 'memcache.distributed' => '\\OC\\Memcache\\Redis', 'memcache.local' => '\\OC\\Memcache\\Redis', 'redis' => array ( 'host' => '127.0.0.1', 'port' => 6379, ), 重启 PHP-FPM 生效:systemctl restart php8.3-fpm 其他缓存方式可以参考官方文档。如果没有问题,可以访问 https://cloud.example.com/settings/admin/serverinfo 查看服务器信息了。配置 Crontab我们需要使用 Linux 内置的 cron 来运行自动化任务,直接使用 www-data 用户修改定时任务:crontab -u www-data -e 选择一款你喜欢的编辑器然后加入:*/5 * * * * /usr/bin/php -f /var/www/nextcloud/cron.php 这个命令的含义是每 5 分钟执行一次 Nextcloud 的定时任务,具体可以参考官网教程。保存后可以使用 crontab -u www-data -l 命令查看当前 www-data 用户下的定时任务。安装 Nextcloud 客户端这里就不再赘述了,直接从官网下载并安装对应操作系统的软件即可,登录的时候输入完整的网址 https://cloud.example.com/ 即可登录你自己的 Nextcloud。Nextcloud 更新如果你的用户和数据不多,直接用管理员访问 https://cloud.example.com/updater/ 即可更新到最新稳定版本。如果服务器的负载较高,可以使用命令行更新:cd /var/www/nextcloud sudo -u www-data php occ upgrade 如果自动下载网速较慢,你也可以手工更新,下载最新版本的 Nextcloud 然后解压到 /var/www/nextcloud 目录,除了 data 和 config 目录,其他都覆盖旧的文件,再执行 sudo -u www-data php /var/www/nextcloud/occ upgrade 即可。具体可以参考官网教程:更新、升级和手工升级。切记更新之前先备份数据,避免丢失重要数据哦。Nextcloud 备份Nextcloud 目前还是个典型的 PHP + MySQL 程序,所以理论上只要备份 /var/www/nextcloud 目录,你的文件储存目录 (默认在 /var/www/nextcloud/data) 以及 MySQL 数据库即可,这里不再赘述。
 -
Debian 12 / Ubuntu 24.04 使用源安装 LAMP 教程 本文将介绍使用官方源和第三方源在 Debian 12 和 Ubuntu 24.04 安装最新版 Apache 2 + PHP + MySQL 的教程,并且可以自行选择 PHP 版本。PS:本文同时适用于 Debian 11 Bullseye,Debian 10 Buster,Ubuntu 20.04 Focal 以及 Ubuntu 22.04 Jammy以下操作需要在 root 用户下完成,请使用 sudo -i 或 su root 切换到 root 用户进行操作。1、更新系统并安装部分必要软件apt update apt upgrade -y apt dist-upgrade -y apt install curl vim wget gnupg dpkg apt-transport-https lsb-release ca-certificates 如果您通过 iso 方式安装 Debian 11 并且设置了 root 密码,则默认不带 sudo 包,使用 apt install sudo 安装即可2、增加 Ondřej Surý 大神打包的 PHP 源并安装 PHP 8.x和 LEMP 安装方法一样,我们还是使用 Ondřej Surý 大佬打包的 PHP 源。至于为啥先装 PHP 再装 Apache 2,因为装了 PHP 以后 Apache 2 会识别你 PHP 版本然后生成对应的配置文件?2.1 Debian 和 Ubuntu 安装 LAMP 区别唯一区别就是 PHP 和 Apache 2 的安装添加源方法不一样,其他的步骤都一毛一样。2.2 加入大神做好的源wget -O /usr/share/keyrings/php.gpg https://packages.sury.org/php/apt.gpg echo "deb [signed-by=/usr/share/keyrings/php.gpg] https://packages.sury.org/php/ $(lsb_release -sc) main" > /etc/apt/sources.list.d/php.list add-apt-repository ppa:ondrej/php 2.3 更新系统源apt update apt upgrade -y 2.4 安装自己需要的 PHP 版本这个源目前默认的 PHP 是 8.3.x,如果您需要其他版本,那么请修改对应的 PHP 版本号 (注意配置文件哦)。这里举例 WordPress 需要的部分 PHP 包安装 PHP 8.3.x:apt install php8.3-{fpm,cli,mysql,curl,gd,mbstring,xml,zip,imap,opcache,soap,gmp,bcmath} -y 安装 PHP 8.2.x:apt install php8.2-fpm php8.2-cli php8.2-mysql php8.2-curl php8.2-gd php8.2-mbstring php8.2-xml php8.2-zip php8.2-imap php8.2-opcache php8.2-soap php8.2-gmp php8.2-bcmath -y 安装 PHP 8.1.xapt install php8.1-fpm php8.1-cli php8.1-mysql php8.1-curl php8.1-gd php8.1-mbstring php8.1-xml php8.1-zip php8.1-imap php8.1-opcache php8.1-soap php8.1-gmp php8.1-bcmath -y 以下版本 PHP 已经 EOL,PHP 官方不再提供支持,请尽快更新您的程序兼容最新的 PHP,如果您的程序还未兼容,建议鞭策开发者安装 PHP 8.0.xapt install php8.0-fpm php8.0-cli php8.0-mysql php8.0-curl php8.0-gd php8.0-mbstring php8.0-xml php8.0-zip php8.0-imap php8.0-opcache php8.0-soap php8.0-gmp php8.0-bcmath -y 安装 PHP 7.4.xapt install php7.4-fpm php7.4-cli php7.4-mysql php7.4-curl php7.4-gd php7.4-mbstring php7.4-xml php7.4-xmlrpc php7.4-zip php7.4-json php7.4-imap php7.4-opcache php7.4-soap php7.4-gmp php7.4-bcmath -y 安装 PHP 7.3.xapt install php7.3-fpm php7.3-mysql php7.3-curl php7.3-gd php7.3-mbstring php7.3-xml php7.3-xmlrpc php7.3-zip php7.3-opcache 安装 PHP 7.2.x (PHP 7.2 开始已经不支持 mcrypt 组件)apt install php7.2-fpm php7.2-mysql php7.2-curl php7.2-gd php7.2-mbstring php7.2-xml php7.2-xmlrpc php7.2-zip php7.2-opcache 安装 PHP 7.1.xapt install php7.1-fpm php7.1-mysql php7.1-curl php7.1-gd php7.1-mbstring php7.1-mcrypt php7.1-xml php7.1-xmlrpc php7.1-zip php7.1-opcache 安装 PHP 7.0.xapt php7.0-fpm php7.0-mysql php7.0-curl php7.0-gd php7.0-mbstring php7.0-mcrypt php7.0-xml php7.0-xmlrpc php7.0-zip php7.0-opcache 安装 PHP 5.6.xapt install php5.6-fpm php5.6-mysql php5.6-curl php5.6-gd php5.6-mbstring php5.6-mcrypt php5.6-xml php5.6-xmlrpc php5.6-zip php5.6-opcache 如果希望安装其他组件,可以通过搜索看看有没有对应的包apt-cache search php8.3* | grep php 修改 php.ini 防止跨目录攻击,如果安装的 PHP 8.2.x 请相应修改 /etc/php/8.3/fpm/php.ini PHP 7.4.x 请相应修改 /etc/php/7.4/fpm/php.inised -i 's/;cgi.fix_pathinfo=1/cgi.fix_pathinfo=0/' /etc/php/8.3/fpm/php.ini 修改 php.ini 增加上传大小限制sed -i 's/upload_max_filesize = 2M/upload_max_filesize = 10M/' /etc/php/8.3/fpm/php.ini sed -i 's/post_max_size = 8M/post_max_size = 10M/' /etc/php/8.3/fpm/php.ini 您也可以同时安装多个 PHP 版本,然后使用以下命令选择系统默认的 PHP 版本:update-alternatives --config php 3、增加 Ondřej Surý 大神打包的 Apache 2 源并安装这里我们推荐 Ondřej Surý 打包的 Apache 2 源。3.1 Debian 和 Ubuntu 安装 LAMP 区别唯一区别就是 Apache 2 和 PHP 的安装添加源方法不一样,其他的步骤都一毛一样。3.2 首先增加 Apache 源wget -O /usr/share/keyrings/apache2.gpg https://packages.sury.org/apache2/apt.gpg echo "deb [signed-by=/usr/share/keyrings/apache2.gpg] https://packages.sury.org/apache2/ $(lsb_release -sc) main" > /etc/apt/sources.list.d/apache2.list add-apt-repository ppa:ondrej/apache2 3.3 接着更新并接安装 Apache 2.4apt update apt upgrade -y apt install apache2 -y 安装完毕后,我们可以使用 apache2 -v 命令看到 Apache 2 已经是最新的 2.4 版本了root@debian ~ # apache2 -v Server version: Apache/2.4.54 (Debian) Server built: 2022-06-08T16:00:36 3.4 Apache 2 开启 PHP-FPM 支持首先,需要开启 Apache 2 的 PHP-FPM 支持,我们以 PHP 8.3 为例,按照自己的需求,可以开启如下模块a2enconf php8.3-fpm a2enmod proxy_fcgi a2enmod headers a2enmod http2 a2enmod remoteip a2enmod ssl a2enmod rewrite a2enmod expires a2enmod deflate a2enmod mime a2enmod setenvif 然后我们重启 PHP-FPM 服务systemctl restart php8.3-fpm 对应 PHP 7.4.x 命令如下systemctl restart php7.4-fpm Apache 2 参考配置文件如下,因为默认 Debian 的 Apache 2 默认配置已经使用了 example.com 这个域名,所以我们以 example.org 为例,新建立个 /etc/apache2/sites-available/example.org.confcat >> /etc/apache2/sites-available/example.org.conf << EOF <VirtualHost *:80> ServerName example.org DocumentRoot /var/www/example.org DirectoryIndex index.php index.html index.htm ErrorLog ${APACHE_LOG_DIR}/example.org.error.log CustomLog ${APACHE_LOG_DIR}/example.org.access.log combined <Directory /var/www/example.org> Options FollowSymLinks AllowOverride All Require all granted </Directory> </VirtualHost> EOF 然后使用 a2ensite 命令使其生效a2ensite example.org.conf 如果不需要这个 vhost 的时候可以使用 a2dissite example.org.conf 命令移除检测是否已经软链接到 /etc/apache2/sites-enabled 目录root@debian ~ # ls /etc/apache2/sites-enabled 000-default.conf example.org.conf 到这里基本没有问题,我们可以执行 apache2ctl configtest 命令检查配置文件是否出错root@debian ~ # apache2ctl configtest Syntax OK 显示 Syntax OK 则说明所有配置文件均无问题,可以重启 Apache 2 使我们的配置生效systemctl restart apache2 我们的目录在 /var/www/example.org,我们先创建这个目录mkdir -p /var/www/example.org 然后创建一个 phpinfo.php 并输入 phpinfo() 函数cat >> /var/www/example.org/phpinfo.php << EOF <?php phpinfo(); ?> EOF 好了,此时在浏览器输入 http://example.org/phpinfo.php,如果看到经典的 phpinfo 页面则说明安装成功,如果不成功,请仔细对比步骤查找哪里出错或在烧饼博客下方留言。最终效果如下:4、安装 MariaDB这里我们使用 MariaDB 作为 MySQL 的代替4.1 首先,添加并导入 Mariadb 的官方源按照官方的教程导入 GPG下载 GPG Key:curl -sSL https://mariadb.org/mariadb_release_signing_key.asc | gpg --dearmor > /usr/share/keyrings/mariadb.gpg 然后添加 MariaDB 的源echo "deb [arch=$(dpkg --print-architecture) signed-by=/usr/share/keyrings/mariadb.gpg] https://mirror-cdn.xtom.com/mariadb/repo/11.4/debian $(lsb_release -sc) main" > /etc/apt/sources.list.d/mariadb.list echo "deb [arch=$(dpkg --print-architecture) signed-by=/usr/share/keyrings/mariadb.gpg] https://mirror-cdn.xtom.com/mariadb/repo/11.4/ubuntu $(lsb_release -sc) main" > /etc/apt/sources.list.d/mariadb.list 国内可以用清华 TUNA 的源echo "deb [arch=$(dpkg --print-architecture) signed-by=/usr/share/keyrings/mariadb.gpg] https://mirrors.tuna.tsinghua.edu.cn/mariadb/repo/11.4/debian $(lsb_release -sc) main" > /etc/apt/sources.list.d/mariadb.list echo "deb [arch=$(dpkg --print-architecture) signed-by=/usr/share/keyrings/mariadb.gpg] https://mirrors.tuna.tsinghua.edu.cn/mariadb/repo/11.4/ubuntu $(lsb_release -sc) main" > /etc/apt/sources.list.d/mariadb.list 您也可以在这儿找到更多的 MariaDB 源4.2 接着更新一下系统apt update 4.3 然后直接安装最新稳定版 MariaDBapt install mariadb-server mariadb-client 安装完毕后强烈推荐使用 mariadb-secure-installation 命令做一次安全设置4.4 创建数据库并测试开启数据库之前,您可以使用 pwgen 这个小工具或者随机密码生成器生成一个强大的随机密码,比如 32 位,然后随意挑选一个使用apt install pwgen pwgen 32 使用 MySQL root 用户登陆,因为默认使用 Unix domain socket 模式,所以本机不需要 MySQL root 密码即可登录mariadb -u root 创建数据库 example_databaseCREATE DATABASE example_database DEFAULT CHARACTER SET utf8mb4 COLLATE utf8mb4_unicode_ci; 创建用户名 example_user 并赋予权限GRANT ALL ON example_database.* TO 'example_user'@'localhost' IDENTIFIED BY '这里改成您要设置的强大的没人能猜出来的随机的密码'; 刷新 MySQL 权限FLUSH PRIVILEGES; 没问题以后就可以退出了EXIT; 新建立一个 /var/www/example.org/mysql-test.php 文件并测试cat >> /var/www/example.org/mysql-test.php << EOF <?php \$dbname = 'example_database'; //MySQL 数据库名 \$dbuser = 'example_user'; //MySQL 用户名 \$dbpass = '您的强大的没人可以猜出来的密码'; \$dbhost = 'localhost'; //安装在本地就用 localhost \$link = mysqli_connect(\$dbhost, \$dbuser, \$dbpass) or die("Unable to Connect to '\$dbhost'"); mysqli_select_db(\$link, \$dbname) or die("Could not open the db '\$dbname'"); \$test_query = "SHOW TABLES FROM \$dbname"; \$result = mysqli_query(\$link, \$test_query); \$tblCnt = 0; while(\$tbl = mysqli_fetch_array(\$result)) { \$tblCnt++; #echo \$tbl[0]."<br />\n"; } if (!\$tblCnt) { echo "MySQL is working fine. There are no tables."; } else { echo "MySQL is working fine. There are \$tblCnt tables."; } ?> EOF 创建完毕后访问 http://example.org/mysql-test.php 如果出现 MySQL is working fine. There are no tables. 则说明 MySQL 工作正常。5、安装 MySQL 8.0 (可选)如果您必须使用某些 MySQL 8.0 才有的功能,那么可以按照 MySQL 官网的教程安装 MySQL 8.0*注意:*除非您知道您在做什么,否则不要同时安装 MySQL 和 MariaDB5.1 添加 apt 源wget https://repo.mysql.com/mysql-apt-config_0.8.29-1_all.deb dpkg -i mysql-apt-config_0.8.29-1_all.deb 国内的机器可以在添加完成后修改为清华 TUNA 源,您可以修改 /etc/apt/sources.list.d/mysql-community.list 文件,替换成如下内容deb https://mirrors.tuna.tsinghua.edu.cn/mysql/apt/debian $(lsb_release -sc) mysql-5.6 mysql-5.7 mysql-8.0 mysql-tools 5.2 安装 MySQL 8.0apt update apt install mysql-server -y 默认 MySQL 会安装最新的 8.0 版本,如果您需要更低的版本,比如 5.6 或 5.7,可以使用如下命令:dpkg-reconfigure mysql-apt-config 您可能需要设置一个强大的 root 密码,接下来的步骤和 MariaDB 基本相同,把 mariadb 命令换成 mysql 命令即可,本文不再赘述。好了,以上就是基本的 Debian 11.x “Bullseye” 安装最新版 LAMP 的教程,如有问题可以随时发评论留言讨论。
-
Debian 12 / Ubuntu 24.04 使用源安装 LEMP 教程 本文将介绍使用官方源和第三方源在 Debian 12 和 Ubuntu 24.04 安装最新版 Nginx + PHP + MySQL 的教程,并且可以自行选择 PHP 版本。PS:本文同时适用于 Debian 11 Bullseye,Debian 10 Buster,Ubuntu 20.04 Focal 以及 Ubuntu 22.04 Jammy以下操作需要在 root 用户下完成,请使用 sudo -i 或 su root 切换到 root 用户进行操作。1、更新系统并安装部分必要软件apt update apt upgrade -y apt install curl vim wget gnupg dpkg apt-transport-https lsb-release ca-certificates 如果您通过 iso 方式安装 Debian 12 并且设置了 root 密码,则默认不带 sudo 包,使用 apt install sudo 安装即可2、增加烧饼博客打包的 Nginx 源并安装这里我们推荐烧饼博客团队打包的 Nginx 源,这货是会官方 Nginx 打包组的基础上,保持更新最新版本的 Nginx 以及 OpenSSL。2.1 首先增加 GPG Keycurl -sSL https://n.wtf/public.key | gpg --dearmor > /usr/share/keyrings/n.wtf.gpg 2.2 然后增加 Nginx 源echo "deb [arch=$(dpkg --print-architecture) signed-by=/usr/share/keyrings/n.wtf.gpg] https://mirror-cdn.xtom.com/sb/nginx/ $(lsb_release -sc) main" > /etc/apt/sources.list.d/n.wtf.list 国内机器可以用清华 TUNA 的国内源:echo "deb [arch=$(dpkg --print-architecture) signed-by=/usr/share/keyrings/n.wtf.gpg] https://mirrors.tuna.tsinghua.edu.cn/u.sb/ $(lsb_release -sc) main" > /etc/apt/sources.list.d/n.wtf.list 2.3 接着更新并安装 Nginxapt update apt install nginx-extras -y 安装完毕后,我们可以使用 nginx -V 命令看到 Nginx 已经是最新的 1.27.0 主线版了:root@debian ~ # nginx -V nginx version: nginx-n.wtf/1.27.0 built with OpenSSL 3.3.1 4 Jun 2024 TLS SNI support enabled 3、增加 Ondřej Surý 大神打包的 PHP 源并安装 PHP 8.xOndřej Surý 大佬打包的 PHP 源更好用,Ubuntu 的 PPA for PHP 就是这位大佬做的,当然少不了 Debian 的源了,下面一步一步来。3.1 Debian 和 Ubuntu 安装 LEMP 区别唯一区别就是 PHP 的安装添加源方法不一样,其他的步骤都一毛一样。3.2 加入大神做好的源wget -O /usr/share/keyrings/php.gpg https://packages.sury.org/php/apt.gpg echo "deb [arch=$(dpkg --print-architecture) signed-by=/usr/share/keyrings/php.gpg] https://packages.sury.org/php/ $(lsb_release -sc) main" > /etc/apt/sources.list.d/php.list add-apt-repository ppa:ondrej/php 这个大神的 GPG 密钥每两年会更新一个新的,如果 GPG 密钥失效,重新下载 GPG 密钥即可。国内机器可以用南京大学 的国内源:wget -O /usr/share/keyrings/php.gpg https://mirror.nju.edu.cn/sury/php/apt.gpg echo "deb [arch=$(dpkg --print-architecture) signed-by=/usr/share/keyrings/php.gpg] https://mirror.nju.edu.cn/sury/php/ $(lsb_release -sc) main" > /etc/apt/sources.list.d/php.list Ubuntu 的 PPA 暂时没有国内镜像,可以使用 USTC 反代的方式:curl "https://keyserver.ubuntu.com/pks/lookup?op=get&search=0x14aa40ec0831756756d7f66c4f4ea0aae5267a6c" | gpg --dearmor > /usr/share/keyrings/php.gpg echo "deb [arch=$(dpkg --print-architecture) signed-by=/usr/share/keyrings/php.gpg] https://launchpad.proxy.ustclug.org/ondrej/php/ubuntu $(lsb_release -sc) main" > /etc/apt/sources.list.d/php.list 如果 GPG 密钥失效,请查看最新的 GPG 密钥。3.3 更新系统apt update apt upgrade -y 3.4 安装自己需要的 PHP 版本这个源目前默认的 PHP 是 8.3.x,如果您需要其他版本,那么请修改对应的 PHP 版本号 (注意配置文件哦)。这里举例 WordPress 需要的部分 PHP 包:安装 PHP 8.3.x:apt install php8.3-{fpm,cli,mysql,curl,gd,mbstring,xml,zip,imap,opcache,soap,gmp,bcmath} -y 安装 PHP 8.2.x:apt install php8.2-fpm php8.2-cli php8.2-mysql php8.2-curl php8.2-gd php8.2-mbstring php8.2-xml php8.2-zip php8.2-imap php8.2-opcache php8.2-soap php8.2-gmp php8.2-bcmath -y 安装 PHP 8.1.x:apt install php8.1-fpm php8.1-cli php8.1-mysql php8.1-curl php8.1-gd php8.1-mbstring php8.1-xml php8.1-zip php8.1-imap php8.1-opcache php8.1-soap php8.1-gmp php8.1-bcmath -y 以下版本 PHP 已经 EOL,PHP 官方不再提供支持,请尽快更新您的程序兼容最新的 PHP,如果您的程序还未兼容,建议鞭策开发者安装 PHP 8.0.x:apt install php8.0-fpm php8.0-cli php8.0-mysql php8.0-curl php8.0-gd php8.0-mbstring php8.0-xml php8.0-zip php8.0-imap php8.0-opcache php8.0-soap php8.0-gmp php8.0-bcmath -y 安装 PHP 7.4.x:apt install php7.4-fpm php7.4-cli php7.4-mysql php7.4-curl php7.4-gd php7.4-mbstring php7.4-xml php7.4-xmlrpc php7.4-zip php7.4-json php7.4-imap php7.4-opcache php7.4-soap php7.4-gmp php7.4-bcmath -y 安装 PHP 7.3.x:apt install php7.3-fpm php7.3-mysql php7.3-curl php7.3-gd php7.3-mbstring php7.3-xml php7.3-xmlrpc php7.3-zip php7.3-opcache 安装 PHP 7.2.x (PHP 7.2 开始已经不支持 mcrypt 组件):apt install php7.2-fpm php7.2-mysql php7.2-curl php7.2-gd php7.2-mbstring php7.2-xml php7.2-xmlrpc php7.2-zip php7.2-opcache 安装 PHP 7.1.x:apt install php7.1-fpm php7.1-mysql php7.1-curl php7.1-gd php7.1-mbstring php7.1-mcrypt php7.1-xml php7.1-xmlrpc php7.1-zip php7.1-opcache 安装 PHP 7.0.x:apt php7.0-fpm php7.0-mysql php7.0-curl php7.0-gd php7.0-mbstring php7.0-mcrypt php7.0-xml php7.0-xmlrpc php7.0-zip php7.0-opcache 安装 PHP 5.6.x:apt install php5.6-fpm php5.6-mysql php5.6-curl php5.6-gd php5.6-mbstring php5.6-mcrypt php5.6-xml php5.6-xmlrpc php5.6-zip php5.6-opcache 如果希望安装其他组件,可以通过搜索看看有没有对应的包:apt-cache search php8.3* | grep php 修改 php.ini 防止跨目录攻击,如果安装的 PHP 8.3.x 请修改 /etc/php/8.3/fpm/php.ini PHP 7.4.x 请对应修改 /etc/php/7.4/fpm/php.ini:sed -i 's/;cgi.fix_pathinfo=1/cgi.fix_pathinfo=0/' /etc/php/8.3/fpm/php.ini 修改 php.ini 增加上传大小限制,比如我们设置 10MB:sed -i 's/upload_max_filesize = 2M/upload_max_filesize = 10M/' /etc/php/8.3/fpm/php.ini sed -i 's/post_max_size = 8M/post_max_size = 10M/' /etc/php/8.3/fpm/php.ini 您也可以同时安装多个 PHP 版本,然后使用以下命令选择系统默认的 PHP 版本:update-alternatives --config php 3.5 重启 PHP 和 Nginxsystemctl restart php8.3-fpm 对应 PHP 7.4.x 命令如下:systemctl restart php7.4-fpm Nginx 参考配置文件如下,新建立个 /etc/nginx/sites-available/example.com.conf:cat >> /etc/nginx/sites-available/example.com.conf << EOF server { listen 80; listen [::]:80; # 指定网站目录,可根据自己情况更换,建议放在 /var/www 目录下 root /var/www/example.com; index index.php index.html index.htm; # 默认第一个域名,替换 example.com 为您的域名 server_name example.com; location / { try_files \$uri \$uri/ =404; } # 开启 PHP8.3-fpm 模式,如需要安装 PHP 7.4.x 请修改为 fastcgi_pass unix:/run/php/php7.4-fpm.sock; location ~ \.php$ { include snippets/fastcgi-php.conf; fastcgi_pass unix:/run/php/php8.3-fpm.sock; } } EOF 然后把这个配置文件软链接到 /etc/nginx/sites-enabled 目录使其生效:ln -s /etc/nginx/sites-available/example.com.conf /etc/nginx/sites-enabled/example.com.conf 到这里基本没有问题,可以直接重新加载 Nginx:nginx -t nginx -s reload 或者暴力点直接重启 Nginx:systemctl restart nginx 我们的目录在 /var/www/example.com,我们先创建这个目录:mkdir -p /var/www/example.com 然后创建一个 phpinfo.php 并输入 phpinfo() 函数:cat >> /var/www/example.com/phpinfo.php << EOF <?php phpinfo(); ?> EOF 好了,此时在浏览器输入 http://example.com/phpinfo.php,如果看到经典的 phpinfo 页面则说明安装成功,如果不成功,请仔细对比步骤查找哪里出错。效果如下:4、安装 MariaDB自从 Debian 9.x Stretch 开始,Debian 已经默认使用 Mariadb,所以我们不做对于 MySQL 和 MariaDB 的争论,直接跟着开源社区走即可。4.1 首先,添加并导入 Mariadb 的官方源下载 GPG Key:curl -sSL https://mariadb.org/mariadb_release_signing_key.asc | gpg --dearmor > /usr/share/keyrings/mariadb.gpg 然后添加 MariaDB 的源:echo "deb [arch=$(dpkg --print-architecture) signed-by=/usr/share/keyrings/mariadb.gpg] https://mirror-cdn.xtom.com/mariadb/repo/11.4/debian $(lsb_release -sc) main" > /etc/apt/sources.list.d/mariadb.list echo "deb [arch=$(dpkg --print-architecture) signed-by=/usr/share/keyrings/mariadb.gpg] https://mirror-cdn.xtom.com/mariadb/repo/11.4/ubuntu $(lsb_release -sc) main" > /etc/apt/sources.list.d/mariadb.list 国内可以用清华 TUNA 的源:echo "deb [arch=$(dpkg --print-architecture) signed-by=/usr/share/keyrings/mariadb.gpg] https://mirrors.tuna.tsinghua.edu.cn/mariadb/repo/11.4/debian $(lsb_release -sc) main" > /etc/apt/sources.list.d/mariadb.list echo "deb [arch=$(dpkg --print-architecture) signed-by=/usr/share/keyrings/mariadb.gpg] https://mirrors.tuna.tsinghua.edu.cn/mariadb/repo/11.4/ubuntu $(lsb_release -sc) main" > /etc/apt/sources.list.d/mariadb.list 您也可以在这儿找到更多的 MariaDB 源。4.2 接着更新一下系统apt update 4.3 然后直接安装最新稳定版 MariaDBapt install mariadb-server mariadb-client 安装完毕后强烈推荐使用 mariadb-secure-installation 命令做一次安全设置。4.4 创建数据库并测试开启数据库之前,您可以使用 pwgen 这个小工具或者随机密码生成器生成一个强大的随机密码,比如 32 位,然后随意挑选一个使用apt install pwgen pwgen 32 使用 Mariadb root 用户登陆,因为默认使用 Unix domain socket 模式,所以本机不需要 MySQL root 密码即可登录:mariadb -u root 创建数据库 example_database:CREATE DATABASE example_database DEFAULT CHARACTER SET utf8mb4 COLLATE utf8mb4_unicode_ci; 创建用户名 example_user 并赋予权限:GRANT ALL ON example_database.* TO 'example_user'@'localhost' IDENTIFIED BY '这里改成您要设置的强大的没人能猜出来的随机的密码'; 刷新 MySQL 权限:FLUSH PRIVILEGES; 没问题以后就可以退出了:EXIT; 新建立一个 /var/www/example.com/mysql-test.php 文件并测试:cat >> /var/www/example.com/mysql-test.php << EOF <?php \$dbname = 'example_database'; //MySQL 数据库名 \$dbuser = 'example_user'; //MySQL 用户名 \$dbpass = '您的强大的没人可以猜出来的密码'; \$dbhost = 'localhost'; //安装在本地就用 localhost \$link = mysqli_connect(\$dbhost, \$dbuser, \$dbpass) or die("Unable to Connect to '\$dbhost'"); mysqli_select_db(\$link, \$dbname) or die("Could not open the db '\$dbname'"); \$test_query = "SHOW TABLES FROM \$dbname"; \$result = mysqli_query(\$link, \$test_query); \$tblCnt = 0; while(\$tbl = mysqli_fetch_array(\$result)) { \$tblCnt++; #echo \$tbl[0]."<br />\n"; } if (!\$tblCnt) { echo "MySQL is working fine. There are no tables."; } else { echo "MySQL is working fine. There are \$tblCnt tables."; } ?> EOF 创建完毕后访问 http://example.com/mysql-test.php 如果出现 MySQL is working fine. There are no tables. 则说明 MariaDB 工作正常。5、安装 MySQL 8.0 (可选)如果您必须使用某些 MySQL 8.0 才有的功能,那么可以按照 MySQL 官网的教程安装 MySQL 8.0。*注意:*除非您知道您在做什么,否则不要同时安装 MySQL 和 MariaDB。5.1 添加 apt 源wget https://repo.mysql.com/mysql-apt-config_0.8.30-1_all.deb dpkg -i mysql-apt-config_0.8.30-1_all.deb 国内的机器可以在添加完成后修改为清华 TUNA 源,您可以修改 /etc/apt/sources.list.d/mysql-community.list 文件,替换成如下内容:deb https://mirrors.tuna.tsinghua.edu.cn/mysql/apt/debian $(lsb_release -sc) mysql-5.6 mysql-5.7 mysql-8.0 mysql-tools 5.2 安装 MySQL 8.0apt update apt install mysql-server -y 默认 MySQL 会安装最新的 8.0 版本,如果您需要更低的版本,比如 5.6 或 5.7,可以使用如下命令:dpkg-reconfigure mysql-apt-config 您可能需要设置一个强大的 root 密码,接下来的步骤和 MariaDB 基本相同,把 mariadb 命令换成 mysql 命令即可,本文不再赘述。好了,以上就是基本的 Debian 12.x “bookworm” 安装最新版 LEMP 的教程,如有问题可以随时发评论留言讨论。
-
Docker 安装 Shlink 自建短网址 本文将指导使用 Docker 安装 Shlink 搭建自建短网址服务。PS:本文同时适用于任何可安装 Docker 的 Linux 发行版。什么是短网址?短网址,即 URL Shortener (缩略网址服务),一般我们使用 HTTP 协议 的 301 或 302 响应码,现在也有使用 307 或 308 来跳转一个长网址。MDN 上有对这几个状态码的详细介绍:301 Moved Permanently302 Found307 Temporary Redirect308 Permanent Redirect301 和 302 有一个最重要的区别,前者会在浏览器留下缓存,后者不会,导致如果你需要精确的统计访客,尤其是有一些使用一个浏览器的重复访客会不准确,但是影响不大,而使用 302 每次都会请求服务器造成服务器资源紧张,所以一般没有特殊需求的话,使用 301 就行。举一个典型的 301 跳转的例子:root@debian ~ # curl -I http://u.sb/ -A Mozilla HTTP/1.1 301 Moved Permanently Date: Tue, 26 Apr 2022 18:28:14 GMT Content-Type: text/html Content-Length: 162 Location: https://u.sb/ 我们可以看到,使用浏览器访问 http://u.sb/ 的时候,会返回 HTTP/1.1 301 Moved Permanently 状态,对应跳转到 Location https://u.sb/。市面上开源和收费的短网址源码众所周知,本人的短域名贼多,对各种短网址程序都有所研究,市面上主要有这几款免费的短网址程序:Blink - Easy-to-host,SSO-integrated,CDN-powered link shortener (+decoupled analytics) for teams。(Source Code) AGPL-3.0 NodejsKutt - A modern URL shortener with support for custom domains。(Source Code) MIT NodejsPolr - Modern,minimalist,modular,and lightweight URL shortener。(Source Code) GPL-2.0 PHPShlink - URL shortener with REST API and command line interface。Includes official progressive web application and docker images。(Source Code,Clients) MIT PHPYOURLS - YOURLS is a set of PHP scripts that will allow you to run Your Own URL Shortener。Features include password protection,URL customization,bookmarklets,statistics,API,plugins,jsonp。(Source Code) MIT PHP我基本上都安装使用过,数据量大了以后性能基本惨不忍睹,对比以后还是使用 PHP Swoole 写的 Shlink 稍微占优,所以本文推荐安装 Shlink。至于收费的?呵呵,没一个好用的,建议别去踩坑,我都帮你们踩过了。。。安装 Docker 和 Docker ComposeDebian 和 Ubuntu 系统请参考本站教程。其他 Linux 系统可以使用 Docker 官方的脚本安装 Docker 和 Docker Compose:curl -fsSL https://get.docker.com -o get-docker.sh sh get-docker.sh 安装 Shlink Server 和 Web Client参考官网的安装教程,我们可以把 Server 和 Web Client 装在一个地方方便管理。首先我们新建 /opt/shlink 和 /opt/shlink/data 目录:mkdir -p /opt/shlink mkdir -p /opt/shlink/data 然后我们新建一个 docker-compose.yaml 文件,假设你的域名是 example.com,放在 /opt/shlink/docker-compose.yaml:cat >> /opt/shlink/docker-compose.yaml << EOF version: '3.8' services: shlink: image: shlinkio/shlink:stable container_name: shlink ports: - '127.0.0.1:8080:8080' environment: - DEFAULT_DOMAIN=example.com - IS_HTTPS_ENABLED=true - GEOLITE_LICENSE_KEY= - DB_DRIVER=maria - DB_NAME=shlink - DB_USER=shlink - DB_PASSWORD=随机密码1 - DB_HOST=db - DB_PORT=3306 - TIMEZONE=UTC - REDIRECT_STATUS_CODE=301 restart: always db: image: mariadb:10.11 depends_on: - shlink container_name: db ports: - '127.0.0.1:3306:3306' environment: - MYSQL_ROOT_PASSWORD=随机 root 密码 - MYSQL_DATABASE=shlink - MYSQL_USER=shlink - MYSQL_PASSWORD=随机密码1 volumes: - /opt/shlink/data:/var/lib/mysql restart: always shlink-web-client: image: shlinkio/shlink-web-client:stable container_name: shlink-web-client ports: - '127.0.0.1:8081:8080' restart: always EOF GEOLITE_LICENSE_KEY 需要在 Maxmind 注册帐号获取,可以参考《使用 Docker 安装 Plausible Analytics 自建网站统计》MYSQL_ROOT_PASSWORD 和 MYSQL_PASSWORD 记得设置两个随机的密码,同时 MYSQL_PASSWORD 需要和 DB_PASSWORD 一致。更多的环境变量参数可以参考这里。然后拉取 Docker 镜像并运行:cd /opt/shlink docker compose pull docker compose up -d 然后获取一个 API Key:docker exec -it shlink shlink api-key:generate 注意第一个 shlink 是 Docker 容器名字,第二个 shlink 是命令名称。所有 API 命令如下:docker exec -it shlink shlink 记得保存你的 API Key,下面会要用到。安装配置 Nginx 反代我们的 Docker Compose 配置文件中,Shlink Server 服务监听在 127.0.0.1:8080 端口,Shlink Web Client 监听在 127.0.0.1:8081 端口,所以我们需要配置 Nginx 反代来访问,假设你短网址是 https://example.com/ Web 客户端是 https://app.example.com/example.com 段配置: location / { proxy_set_header X-Real-IP $remote_addr; proxy_set_header X-Forwarded-For $proxy_add_x_forwarded_for; proxy_set_header Host $http_host; proxy_http_version 1.1; proxy_set_header Upgrade $http_upgrade; proxy_redirect off; proxy_set_header X-Forwarded-Proto $scheme; proxy_connect_timeout 300; proxy_send_timeout 300; proxy_read_timeout 300; send_timeout 300; proxy_pass http://127.0.0.1:8080; } app.example.com 段配置: location / { proxy_set_header X-Real-IP $remote_addr; proxy_set_header X-Forwarded-For $proxy_add_x_forwarded_for; proxy_set_header Host $http_host; proxy_http_version 1.1; proxy_set_header Upgrade $http_upgrade; proxy_redirect off; proxy_set_header X-Forwarded-Proto $scheme; proxy_connect_timeout 300; proxy_send_timeout 300; proxy_read_timeout 300; send_timeout 300; proxy_pass http://127.0.0.1:8081; } 最后记得参考本站 Nginx SSL 配置教程加上 SSL 证书后,即可访问 https://app.example.com/:点击 + Add a server 添加你的 Shlink 服务:输入名称,URL 和 API Key 以后点击 Create server 即可使用:如果你懒得搭建 Web Client,也可以使用官方现成的服务:Shlink Web Client数据都是储存在浏览器本地的,可放心使用。升级 Shlink直接使用 Docker Compose 升级并删除旧的镜像文件:cd /opt/shlink docker compose pull docker compose up -d docker system prune -f 迁移 Shlink可以参考《使用 Docker 安装 Mailcow 自建域名邮箱》。备份 Shlink我们可以定期备份数据库,导出命令如下:docker exec db /usr/bin/mysqldump -u root --password=随机 root 密码 shlink > shlink-$(date +"%Y_%m_%d_%I_%M_%p").sql 请替换 随机 root 密码 为你的数据库 root 密码。本文短网址:https://z.sh/nBSur
-
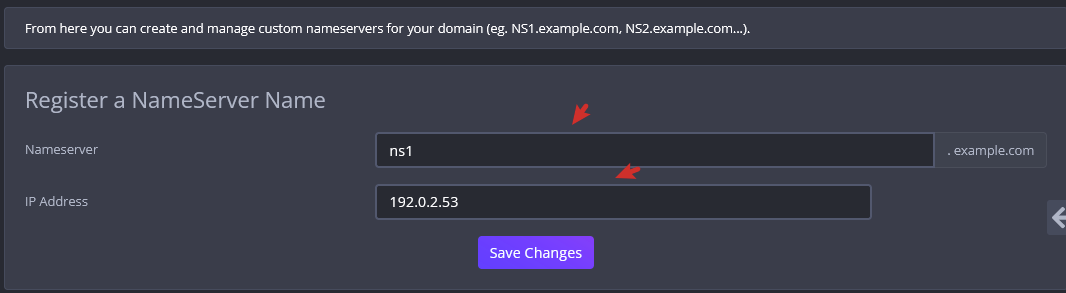
Debian 12 / Ubuntu 24.04 安装 PowerDNS 和 PowerDNS-Admin 自建权威 DNS 教程 本文将指导如何在 Debian 12 和 Ubuntu 24.04 下安装 PowerDNS 以及 PowerDNS-Admin,本教程略复杂,学习者需要有一定的 Linux 运维经验以及熟读本站之前的教程。什么是权威 DNS?DNS 分为两种类型,一种是权威 DNS (Authoritative DNS),一种是递归 DNS (Recursive DNS),权威 DNS 提供 DNS 的解析记录,递归 DNS 提供解析 DNS 记录的功能,是不是有点拗口?通俗来讲,权威 DNS 就是负责储存你的 DNS 解析记录,然后提供给递归 DNS 进行解析操作,举个例子,典型的权威 DNS 即为类似 Cloudflare 的域名解析服务,比如可能分配给你的 bob.ns.cloudflare.com,典型的递归 DNS 即为 Cloudflare 的公共 DNS 服务 1.1.1.1,你的域名的 DNS 记录储存在 bob.ns.cloudflare.com 这台服务器上,而你本地的电脑通过 1.1.1.1 来解析你的域名。本文要介绍的是权威 DNS,递归 DNS 在国内没有相关资质和备案是无法在公网自建的。为什么使用 PowerDNS?按照我们多年的维护经验,PowerDNS 比 Bind 9 维护起来更方便,且原生支持各种数据库方便储存 DNS 记录,而 Bind 9 目前还是仅支持文本储存,其他储存需要安装第三方插件。准备工作首先,我们默认你已经拥有一个或者两个域名至少两台不同网络的 VPS 服务器本文教程举例的域名和对应的 A/AAAA 解析记录如下:域名IPv4IPv6example.com203.0.113.22001:db8::2example.org233.252.0.22001:db8:3ns1.example.com192.0.2.532001:db8::53ns2.example.com198.51.100.532001:db8::153这里我们假设你已经拥有 example.com 这个域名以及 192.0.2.53 和 192.0.2.153 这两台 VPS 服务器,分别对应 ns1.example.com 和 ns2.example.com,那么我们需要分两种情况1、你需要 example.com 也使用 ns1.example.com 和 ns2.example.com 的 DNS 服务:请前往你的域名注册商,添加 NS 记录,也称为 Glue 胶水记录,分别对应ns1.example.com - 192.0.2.53 和 2001:db8::53ns2.example.com - 198.51.100.53 和 2001:db8::153然后修改 example.com 的 NS 记录为 ns1.example.com 和 ns2.example.com,这样就完成了域名的 NS 记录的更新。2、你不需要 example.com 使用 ns1.example.com 和 ns2.example.com 的 DNS 服务,仅仅需要 example.org 使用这个 DNS 服务:前往你的 DNS 服务商,添加 A/AAA 记录,分别对应ns1.example.com - 192.0.2.53 和 2001:db8::53ns2.example.com - 198.51.100.53 和 2001:db8::153此时所有的 ns1.example.com 和 ns2.example.com 的请求会经过你的 DNS 服务商,请务必保证你的 DNS 服务商比较稳定,如果不稳定,就会导致所有的域名 DNS 都无法解析本文以第一种情况为例,假设你要使用的域名 example.com 也同时会使用 ns1.example.com 和 ns2.example.com 的 DNS 服务,每个服务商的后台 UI 可能不一样,我们以 Riven Cloud 为例,注册完域名以后在域名管理页面里找到 Private Nameservers (私人 DNS 服务器) 然后注册 NS 即可:然后在 Nameservers (DNS 服务器) 添加 ns1.example.com 和 ns2.example.com 即可。安装 PowerDNS + Mariadb首先使用 root 进入 ns1.example.com,更新系统apt update apt upgrade -y 然后我们添加 PowerDNS 的官方源,添加 PowerDNS 的 GPG 公钥后增加 apt 源文件:curl -sSL https://repo.powerdns.com/FD380FBB-pub.asc | gpg --dearmor > /usr/share/keyrings/powerdns.gpg cat > /etc/apt/sources.list.d/pdns.list << EOF deb [arch=$(dpkg --print-architecture) signed-by=/usr/share/keyrings/powerdns.gpg] http://repo.powerdns.com/debian $(lsb_release -sc)-auth-49 main deb [arch=$(dpkg --print-architecture) signed-by=/usr/share/keyrings/powerdns.gpg] http://repo.powerdns.com/debian $(lsb_release -sc)-rec-50 main deb [arch=$(dpkg --print-architecture) signed-by=/usr/share/keyrings/powerdns.gpg] http://repo.powerdns.com/debian $(lsb_release -sc)-dnsdist-19 main EOF curl -sSL https://repo.powerdns.com/FD380FBB-pub.asc | gpg --dearmor > /usr/share/keyrings/powerdns.gpg cat > /etc/apt/sources.list.d/pdns.list << EOF deb [arch=$(dpkg --print-architecture) signed-by=/usr/share/keyrings/powerdns.gpg] http://repo.powerdns.com/ubuntu $(lsb_release -sc)-auth-49 main deb [arch=$(dpkg --print-architecture) signed-by=/usr/share/keyrings/powerdns.gpg] http://repo.powerdns.com/ubuntu $(lsb_release -sc)-rec-50 main deb [arch=$(dpkg --print-architecture) signed-by=/usr/share/keyrings/powerdns.gpg] http://repo.powerdns.com/ubuntu $(lsb_release -sc)-dnsdist-19 main EOF 您也可以修改使用 repo.powerdns.com 官方源优先安装 Powerdns 软件:cat >> /etc/apt/preferences.d/pdns << EOF Package: pdns-* Pin: origin repo.powerdns.com Pin-Priority: 600 EOF 然后安装 Mariadb,可以参考本站教程《Debian 使用源安装 LEMP 教程》:下载并导入 GPG Key:curl -sSL https://mariadb.org/mariadb_release_signing_key.asc | gpg --dearmor > /usr/share/keyrings/mariadb.gpg 然后添加 MariaDB 的源:echo "deb [arch=$(dpkg --print-architecture) signed-by=/usr/share/keyrings/mariadb.gpg] https://mirror-cdn.xtom.com/mariadb/repo/11.4/debian $(lsb_release -sc) main" > /etc/apt/sources.list.d/mariadb.list echo "deb [arch=$(dpkg --print-architecture) signed-by=/usr/share/keyrings/mariadb.gpg] https://mirror-cdn.xtom.com/mariadb/repo/11.4/ubuntu $(lsb_release -sc) main" > /etc/apt/sources.list.d/mariadb.list 然后我们就可以更新系统并安装 PowerDNS + Powerdns MySQL Backend + Mariadb:apt update apt install pdns-server pdns-backend-mysql mariadb-server 然后我们重复 ns1.example.com 的操作,安装完成 ns2.example.com 服务器,这里不再赘述。配置 MySQL 主从同步我们使用 ns1.example.com 作为 Master,ns2.example.com 作为 Slave,则需要配置 MySQL 主从同步:首先,在 ns1.example.com 上执行以下命令:建立文件夹,方便以后保存 Bin 日志:mkdir /var/lib/mysql-bin chown mysql:mysql /var/lib/mysql-bin 添加 MariaDB 配置文件,让 MySQL 监听在所有的 IP:cat > /etc/mysql/mariadb.conf.d/61-master.cnf <<EOF [mysqld] skip-host-cache skip-name-resolve bind-address = 0.0.0.0 server-id = $SRANDOM log-bin = /var/lib/mysql-bin/binlog expire_logs_days = 7 EOF 注:我们设置 Master 机器的 ID 为随机数 $SRANDOM安装并开启 nftables,只允许本机和 Slave 机器,也就是 ns2.example.com 可以访问 MySQL 3306 端口:apt install nftables cat > /etc/nftables.conf <<EOF #!/usr/sbin/nft -f flush ruleset table inet filter { chain input { type filter hook input priority filter; policy accept; ip saddr 127.0.0.1 accept ip saddr 198.51.100.53 accept tcp dport 3306 drop } chain forward { type filter hook forward priority filter; policy accept; } chain output { type filter hook output priority filter; policy accept; } } EOF 注意替换 198.51.100.53 为你的 ns2.example.com 的 IPv4 地址新建一个 backup 的 MySQL 用户名并设置密码为 backup_pass,并开启所有数据库的访问权限mariadb -e "GRANT REPLICATION SLAVE, REPLICATION CLIENT ON *.* to 'backup'@'%' identified by 'backup_pass';" 启动 nftables 服务并重启 MariaDB 服务:systemctl enable nftables --now systemctl restart mariadb 然后我们来到 Slave 机器,即 ns2.example.com,执行以下命令:mkdir /var/lib/mysql-bin chown mysql:mysql /var/lib/mysql-bin 添加 MariaDB 配置:cat > /etc/mysql/mariadb.conf.d/61-slave.cnf <<EOF [mysqld] skip-host-cache skip-name-resolve server-id = $SRANDOM relay-log = /var/lib/mysql-bin/relaylog expire_logs_days = 7 EOF 注:我们设置 Slave 机器的 ID 为随机数 $SRANDOM注释 expire_logs_dayssed -i 's/expire_logs_days/#expire_logs_days/g' /etc/mysql/mariadb.conf.d/50-server.cnf 开启 nftbales 服务并写入配置,只允许本机访问 3306 端口:apt install nftables cat > /etc/nftables.conf <<EOF #!/usr/sbin/nft -f flush ruleset table inet filter { chain input { type filter hook input priority filter; policy accept; ip saddr 127.0.0.1 accept tcp dport 3306 drop } chain forward { type filter hook forward priority filter; policy accept; } chain output { type filter hook output priority filter; policy accept; } } EOF 启动 nftables 服务并重启 MariaDB 服务:systemctl enable nftables --now systemctl restart mariadb 然后我们回到 Master 机器,即 ns1.example.com,运行:mariadb -e "show binary logs;\G" 找到最后一个类似 binlog.000001 的日志名称,并对应的 File_size,一般来说,新安装的机器应该为 binlog.000001 和 325然后我们回到 Slave 机器,即 ns2.example.com,运行:mariadb -e "CHANGE MASTER TO MASTER_HOST='192.0.2.53', MASTER_USER='backup', MASTER_PASSWORD='backup_pass', MASTER_PORT=3306, MASTER_LOG_FILE='binlog.000001', MASTER_LOG_POS=325; START SLAVE; SHOW SLAVE STATUS\G" 注意替换 192.0.2.53 为 ns1.example.com 的 IPv4 地址此时可以看到类似输出 Slave_IO_State: Waiting for master to send event,即安装 MySQL 主从同步完成开启 PowerDNS 数据库并导入默认数据配置完 MySQL 主从以后,我们回到 Master 机器,即 ns1.example.com,新添加一个 PowerDNS 的用户和数据库,比如 pdns_user 和 pdns_database 并设置密码 pdns_password:mariadb -u root CREATE DATABASE pdns_database DEFAULT CHARACTER SET utf8mb4 COLLATE utf8mb4_unicode_ci; GRANT ALL ON pdns_database.* TO 'pdns_user'@'%' IDENTIFIED BY 'pdns_password'; FLUSH PRIVILEGES; EXIT; 然后导入 PowerDNS 的建议默认数据库cd /usr/share/pdns-backend-mysql/schema mariadb -u pdns_user --default-character-set=utf8mb4 -p pdns_database < schema.mysql.sql mariadb -u pdns_user --default-character-set=utf8mb4 -p pdns_database < enable-foreign-keys.mysql.sql 此时可以在 ns2.example.com 机器运行:mariadb -e "show databases;\G" 查看是否已经同步 pdns_database 这个数据库,如果过了一分钟还没有,则返回前面的教程仔细看看自己遗漏或者写错了什么。配置 PowerDNS 服务首先,删除默认安装后的 bind.conf:rm -rf /etc/powerdns/pdns.d/bind.conf 然后添加一个 /etc/powerdns/pdns.d/dns.conf 文件并输入输入以下内容:cat >> /etc/powerdns/pdns.d/dns.conf << EOF launch=gmysql gmysql-host=localhost gmysql-user=pdns_user gmysql-dbname=pdns_database gmysql-password=pdns_password gmysql-dnssec=yes default-soa-content=ns1.example.com hostmaster.example.com 0 3600 14400 604800 3600 api=yes api-key=random_api_key local-address=0.0.0.0 :: local-port=53 webserver-address=0.0.0.0 webserver-allow-from=127.0.0.1, ::1, 10.0.0.0/8, 172.16.0.0/12, 192.168.0.0/16 webserver-port=8081 EOF 注意几个地方gmysql-host=localhost gmysql-user=pdns_user gmysql-dbname=pdns_database gmysql-password=pdns_password gmysql-dnssec=yes 这几个 gmysql 开头的参数即 MySQL 数据库连接信息,以及开启 DNSSECdefault-soa-content=ns1.example.com hostmaster.example.com 0 3600 14400 604800 3600 这是添加的域名的默认 SOA 记录ns1.example.com 为默认 DNS 服务器域名,hostmaster.example.com 为默认 DNS 管理员邮箱 hostmaster@example.com,在 SOA 记录里,需要替换 @ 为英文点号第一个 0 为 Serial,没有特殊需求可以从 0 开始后面四个数字分别对应 Refresh,Retry,Expire 和 Minimum TTL,单位都是秒,没有特殊需求建议设置 300 以上api=yes api-key=random_api_key local-address=0.0.0.0 :: local-port=53 webserver-address=0.0.0.0 webserver-allow-from=127.0.0.1, ::1, 10.0.0.0/8, 172.16.0.0/12, 192.168.0.0/16 webserver-port=8081 这段配置则是我们开启了 API 和内置 API Web 服务器,请替换 random_api_key 为你需要的 API Key,随机字符即可,默认我们设置了 Web 服务器监听在所有 IP 并且只能内网 IP 访问,可以按照需求自行更改。local-address=0.0.0.0 :: local-port=53 这段配置表示你的权威 DNS 服务监听在本机所有 IPv4 和 IPv6 地址,并且使用默认的 53 端口。然后我们重启 PowerDNS 服务systemctl restart pdns 没有报错即配置成功。然后我们进入 Slave 机器,即 ns2.example.com 按照同样的配置操作一次。至此,PowerDNS + MySQL 主从已经配置完毕,但是添加域名解析等记录需要直接操作 MySQL 数据库,略显麻烦,此时我们的神奇 PowerDNS-Admin 登场安装并使用 PowerDNS-AdminPowerDNS-Admin 是一款 Python 写的 PowerDNS Web 管理软件,我们需要准备一台单独的机器,测试的时候您也可以直接装在 ns1 或 ns2 上 (不建议) 甚至装在本地电脑上。首先,我们需要安装 Docker 和 Docker Compose,具体方法请参考《Debian 安装 Docker 以及 Docker Compose 教程》安装完毕后,我们在 /opt 目录新建一个 docker-compose.yamlcat > /opt/docker-compose.yaml <<EOF version: '3.9' services: powerdns-admin: image: powerdnsadmin/pda-legacy:latest container_name: powerdns-admin ports: - "127.0.0.1:8080:80" environment: - SECRET_KEY=random_secret_key - SQLALCHEMY_DATABASE_URI=mysql://powerdns-admin-user:powerdns-admin-password@powerdns-admin-mariadb/powerdns-admin-database - GUNICORN_TIMEOUT=60 - GUNICORN_WORKERS=4 - GUNICORN_LOGLEVEL=DEBUG - OFFLINE_MODE=False restart: unless-stopped volumes: - ./data/powerdns-admin:/data depends_on: - powerdns-admin-mariadb powerdns-admin-mariadb: image: mariadb:11.4 container_name: powerdns-admin-mariadb ports: - '127.0.0.1:3306:3306' environment: - MYSQL_ROOT_PASSWORD=mysql_root_password - MYSQL_DATABASE=powerdns-admin-database - MYSQL_USER=powerdns-admin-user - MYSQL_PASSWORD=powerdns-admin-password restart: unless-stopped volumes: - ./data/mysql:/var/lib/mysql EOF 记得修改 random_secret_key 为随机字符串,这个字符串可以随便写,但是不能为空,否则登录后会提示错误。然后我们启动 docker compose:cd /opt docker compose pull docker compose up -d 成功启动后,PowerDNS-Admin 会监听在 127.0.0.1 的 8080 端口,本地机器可以直接访问 http://127.0.0.1:8080 来登录,第一个注册的用户即为管理员。如果您搭建在公网上,我们强烈推荐使用 Nginx 做一层反代服务,安装 Nginx 可以参考教程《Debian 使用源安装 LEMP 教程》以及《Nginx 配置 SSL 证书》安装完成后,在 location 字段中使用如下配置文件即可location / { proxy_set_header X-Real-IP $remote_addr; proxy_set_header X-Forwarded-For $proxy_add_x_forwarded_for; proxy_set_header Host $host; proxy_http_version 1.1; proxy_set_header Upgrade $http_upgrade; proxy_set_header Connection ""; proxy_redirect off; proxy_set_header X-Forwarded-Proto $scheme; proxy_connect_timeout 300; proxy_send_timeout 300; proxy_read_timeout 300; end_timeout 300; proxy_pass http://127.0.0.1:8080; } 然后我们即可登录 PowerDNS-Admin 并注册帐号,第一个帐号即为管理员,登录后输入 PowerDNS 的 API 地址和 API Key 以及 PowerDNS 的版本,截止本文发布,可以填写 4.6.0记得把 PowerDNS-Admin 机器的 IP 加在 ns1.example.com 机器 /etc/powerdns/pdns.d/dns.conf 文件的 webserver-allow-from= 最后,这样 PowerDNS-Admin 就可以访问 PowerDNS 的 API 了。然后我们添加一个域名模板,在左侧 Domain Templates 新建一个域名模板,随便写个名称和描述后,修改添加以下解析内容NameTypeTTLData@SOA86400ns1.example.com. hostmaster.example.com. 0 3600 14400 604800 3600@NS86400ns1.example.com@NS86400ns2.example.com如图所示保存好模板后,点击左侧 New Domain 即可新添加域名 example.com,Type 选默认的 Native,记得选择 Template 为刚刚保存的模板,如无特殊需求,SOA-EDIT-API 选默认的 DEFAULT 即可添加完域名后,我们进入左侧 Dashboard,然后在 Hosted Domains 里选择添加的 example.com如果需要开启 DNSSEC,则点击 DNSSEC 的按钮让其变成 Enabled 即可:我们点击 Enabled 小按钮,需要记录下 DNSKEY 值,一般是一个 “257 + 3 + 13 + 一串字符” 以及第二个 DS 值,一般是一个 “随机数字 + 13 + 2 + 一串字符”,如下图所示:点击 example.com 进入解析页面,点击 Add Record 即可添加解析记录,我们添加以下几个记录NameTypeTTLData@A3600203.0.113.2@AAAA36002001:db8::2ns1A3600192.0.2.53ns1AAAA36002001:db8::53ns2A3600198.51.100.53ns2AAAA36002001:db8::153这里假设的是 example.com 解析到 203.0.113.2 和 2001:db8::2好了,大功告成,然后我们返回注册商的网站添加 DNSSEC 记录,一般我们选择 “随机数字 + 13 + 2 + 一串字符”,分别对应:随机数字 - Key Tag13 - Algorithm 算法 132 - Digest Type,类型 2,即 SHA-256一串字符 - Digest个别后缀 (比如德国 .de 和爱沙尼亚 .ee) 需要添加 DNSKEY,此时我们添加上面截图里的 DNSKey 即可:Flags - 填写 257Protocol - 填写 3Algorithm - 填写 13Public Key - 填写 DNSKEY 对应的一串字符所有的注册商原理都一样,还是以 Riven Cloud 为例,找到域名管理的 DNSSEC Management 选项,按照图示直接添加 DS 记录即可:请注意所有的 gTLD 都明确规定必须支持 DNSSEC,但是国别域名不一定支持,可以通过 dig DS 记录查询你的域名后缀是否支持 DNSSEC此时去耐心喝一杯咖啡,一般域名会在 10 分钟到 24 小时内生效,喝完咖啡后您应该优雅地打开服务器,检查 example.com 是否解析生效并正确首先安装万能的 dnsutilsapt install dnsutils -y 然后查看解析root@debian ~ # host example.com example.com has address 203.0.113.2 example.com has IPv6 address 2001:db8::2 一切正确即安装成功,如果失败,则进入 ns1.example.com 和 ns1.example.com 的服务器分别检查本地解析是否正确root@ns1 ~ # dig A example.com @localhost +short 203.0.113.2 root@ns2 ~ # dig A example.com @localhost +short 203.0.113.2 如果返回正确结果,则检查你的 DNS 是否生效root@ns1 ~ # dig NS example.com +short ns1.example.com. ns2.example.com. 检查公网其他递归 DNS 是否生效root@ns1 ~ # dig NS example.com @1.1.1.1 +short ns1.example.com. ns2.example.com. 检查你的 DNS 是否在注册局被注册 (仅限 gTLD)安装 whois 服务apt install whois 检查 whois 里的 DNS 是否生效root@ns2 ~ # whois example.com | grep 'Name\ Server' Name Server: NS1.EXAMPLE.COM Name Server: NS2.EXAMPLE.COM 检查 DNSSEC 的 DS 记录是否生效root@ns2 ~ # dig DS example.com +short 如果都没问题,则耐心等待 DNS 缓存生效,一般 gTLD 生效时间在 24 小时内,如果你的域名是国别域名,则可能需要等待 72 小时,切记生效前不要删除旧的 DNS 服务。如果遇到超时等问题,请检查您的云服务器提供商防火墙是否正确打开 UDP 53 和 TCP 53 以及 TCP 3306 端口课后作业,安装搭建完 PowerDNS + PowerDNS-Admin 后添加 example.org 域名并解析到 233.252.0.2 和 2001:db8:3 然后测试本地是否生效。